Why Everyone Is Suddenly Building Their Own Music Boxes
There's something almost magical about a music box. The tiny, precise mechanism. The delicate chime of notes arranged into a melody you recognize. The way it sits on a shelf and feels somehow both nostalgic and brand new. Music boxes have existed for centuries, but in the last few years a new wave of makers, hobbyists, and creative thinkers have started building them from scratch and for good reason.
The rise of the DIY and maker culture has brought with it a renewed interest in things that are handmade, meaningful, and crafted with intention. Building a music box checks every one of those boxes. It's a project that blends engineering with artistry, patience with payoff, and the quiet satisfaction of seeing a finished object that you made with your own two hands.
This guide is for everyone. Whether you're a curious teenager picking up your first craft kit, a parent looking for a weekend project to share with your family, a seasoned hobbyist branching into mechanical music, or someone hunting for the most thoughtful handmade gift imaginable, this is your complete starting point.
What Is a DIY Music Box, Exactly?
A music box is a mechanical instrument that plays a melody by using a rotating cylinder fitted with small pins that pluck the tuned teeth of a steel comb. It's an entirely acoustic mechanism, no batteries, no speakers, no digital processing. Just physics, precision, and craft.
A DIY music box kit takes that same mechanism and packages it into an assembly experience. You receive all the components , the movement, the frame, decorative panels, and laser-cut wooden parts and you build it yourself. The result is both a functional musical instrument and a decorative object with genuine personal value.
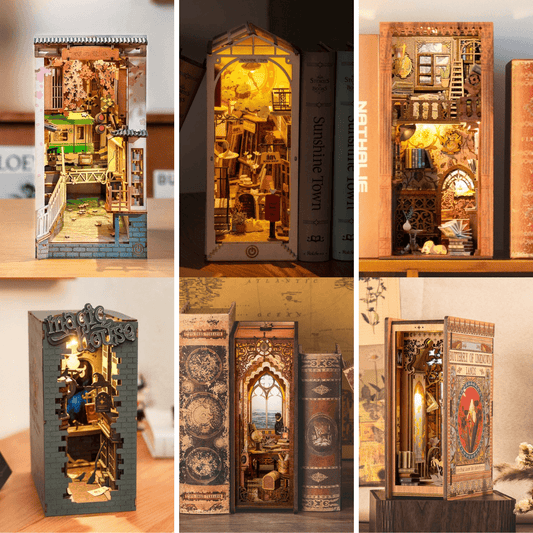
What makes DIY music boxes especially compelling is the range of styles available today. Some kits are simple and compact. Others evoke entire cityscapes with intricate laser-cut skyline panels that, once assembled, transform into stunning display art that also plays music. The aesthetic range is remarkable, which is exactly why these kits resonate with adults and teens just as much as younger builders.
Tools and Materials You'll Need Before You Begin
Most quality DIY music box kits are designed to be self-contained everything critical should be in the box. That said, a few extra items will make your experience considerably smoother.
Essentials:
Tweezers. Fine-tipped tweezers are invaluable for placing tiny components, threading mechanisms, and handling small wooden panels without bending anything or leaving fingerprints.
Wood glue or craft glue. Most kits use interlocking joints, but a small drop of glue at key connection points increases durability especially if the finished piece will be handled often.
A clean, flat workspace. Use a table with good lighting and keep a small tray nearby to catch the tiny screws or springs that tend to escape at the worst possible moment.
A soft cloth or felt mat. Protects both the wooden panels and your table surface during the more delicate parts of the build.
Patience. This is not a race. A quality build can take anywhere from two to five hours depending on complexity. Treat it like meditation, not a deadline.
Nice to have: a magnifying lamp for detail work, painter's tape to hold pieces while glue dries, fine sandpaper (220 grit) to smooth rough panel edges before assembly, and a small clamp to hold the frame together during drying.
Choosing the Right Kit for Your Skill Level
Not all music box kits are equal. The range runs from simple crank-operated designs that can be assembled in under an hour to elaborate architectural models with dozens of components. Choosing the right starting point matters.
For first-time builders, start with something that has a clear illustrated guide and a manageable component count. The goal for your first build is less about creating the most impressive object and more about learning the process, how the mechanism fits together, how wooden panels interlock, how the musical movement connects to the structure.
The Twilight Cityscape DIY Music Box is a strong choice here. Its design balances visual ambition — a beautifully detailed city silhouette with a build complexity that stays accessible. The laser-cut panels slot together with satisfying precision, and the music movement delivers a genuinely lovely melody once everything clicks into place. First-timers consistently find it rewarding rather than frustrating, which is exactly what you want from an introductory build.
For intermediate makers who've assembled a kit or two and want to step up in complexity, the London City DIY Music Box is a standout option. It captures the iconic character of the London skyline in a detailed, multi-layer wooden structure that builds in stages. Working through it feels genuinely immersive each layer brings the cityscape into sharper relief, and by the time you wind the movement for the first time and hear the melody play through the finished structure, the sense of accomplishment is real. It's also one of the most impressive shelf pieces in this category.
For experienced hobbyists and gift buyers who want the most striking finished object, look for kits that push both the visual design and the mechanical complexity further. The Urban Odyssey DIY Music Box falls squarely into this tier the kind of build that becomes a conversation piece the moment someone spots it across a room. The finished result has the polish of something gallery-worthy, and it makes a deeply thoughtful gift for adults: a partner, a parent, a friend who values craft and design in equal measure.
Step-by-Step: How to Build a DIY Music Box
While every kit comes with its own specific instructions, the general process for assembling a wooden DIY music box follows a reliable sequence you can apply to almost any build.
Step 1: Unbox and inventory everything. Before you touch a single component, lay everything out and compare it against the parts list in your instruction booklet. Count the pieces. Check that the music movement is included and undamaged. This step takes five minutes and saves you from discovering a missing piece halfway through the build.
Step 2: Prepare your panels. Laser-cut wooden panels often come attached to a larger wooden sheet via small connection tabs. Carefully press or gently cut each panel free. If there are rough edges at the connection points, use fine sandpaper to smooth them down before assembly. Rough edges prevent panels from seating flush, which affects both structural integrity and the visual finish of the completed piece.
Step 3: Assemble the base frame. Most kits begin with the base, which establishes the foundation everything else mounts onto. Follow the sequence precisely, the order matters, because some panels can only be inserted before others are in place. Don't apply permanent glue until you've done a dry fit and confirmed everything aligns correctly.
Step 4: Install the music movement. The movement is the heart of the project and deserves careful handling. Seat it gently, ensure it's oriented correctly with the winding key accessible, and secure it per the kit instructions. Once it's seated, give it a few test winds and listen. You should hear the full melody play cleanly before you enclose the mechanism with further panels. It's much easier to address movement issues now than after the box is fully assembled.
Step 5: Build the outer structure and decorative panels. With the movement secured and tested, continue assembling the outer structure in the sequence the instructions specify. This is typically the most visually rewarding phase you'll see the design take shape layer by layer. Take your time with alignment. When something feels like it requires too much force, don't push harder. Step back, check the orientation, and try again.
Step 6: Final assembly and quality check. Once the structure is complete, do a visual check of all joints and connections. Apply small drops of wood glue to any connections that feel slightly loose especially the base corners, which take the most stress from handling. Wind the movement, set the finished piece on your shelf, and listen.
Tips for a Professional-Looking Finish
The gap between a music box that looks homemade and one that looks genuinely polished usually comes down to a handful of small details.
Don't rush the dry-fit stage. Assemble the entire kit without glue first. This gives you a complete understanding of how the pieces relate before you commit to permanent bonds. Work in good lighting laser-engraved panels show fine detail you might miss in a dim room, and misaligned engravings are something you'll notice every time you look at the finished piece.
Keep the mechanism clean. Avoid getting glue, sawdust, or debris near the music movement. A contaminated movement can produce buzzing or a muted tone that significantly diminishes the finished experience. Let glue dry fully before testing if any glued joints are still tacky when you start winding, vibration from the mechanism can cause them to shift.
Display thoughtfully. These pieces are designed to be seen. A windowsill with natural light, a clean desk shelf, or a bedside table all make excellent homes. Avoid areas with high humidity or direct sustained sunlight, which can warp or discolor wooden panels over time.
DIY Music Boxes as Gifts: Why They Land So Well
The gifts that resonate most are rarely the most expensive ones. They're the ones that feel chosen with genuine thought that acknowledge something about the person receiving them, their personality, their tastes, the kind of things that bring them joy.
A DIY music box kit hits that mark in a way that's hard to replicate with a standard purchase. It says: I think you'd enjoy making something. I think you'd love the process as much as the result. I think you deserve something beautiful and hand-built sitting on your shelf.
These kits work beautifully for teens and young adults who are curious about making or engineering, for adults who appreciate craftsmanship and hands-on challenge, for couples as a shared weekend activity, for parents and grandparents who value meaningful objects over generic gifts, and for anyone who loves music and the mechanical side of how it gets made.
The one consistent thing people report after gifting these kits: the recipient doesn't just display the finished box, they display it prominently. These are objects with presence.
Customization: Making Your Build Uniquely Yours
One of the underrated aspects of wooden music box kits is how well they take to customization. The natural wood grain gives you a neutral canvas, and there are several ways to personalize the build.
Wood staining dramatically changes the visual character of the finished piece. Dark walnut stains give cityscape panels a dramatic, cinematic look. Light oak or honey stains enhance the wood grain's warmth and feel more traditional. Test on an interior panel first to gauge absorption before committing to the exterior.
Engraving and marking if you have a wood burning tool or fine-tip pen, interior surfaces of the base can be personalized with a date, initials, or a short message. This is especially meaningful when the kit is a gift, turning a beautiful object into something closer to an heirloom.
A finishing coat of matte or satin wood finish applied after assembly protects the panels from handling wear and gives the completed piece a more intentional, gallery-ready quality. Apply in thin coats with light sanding between layers for the best results.
Troubleshooting Common Issues
The melody sounds incomplete or stuttering. This almost always means the movement needs more tension. Wind it fully most movements require 8 to 15 full turns to reach maximum tension. If the issue persists, check that no debris is caught in the comb teeth.
A panel joint keeps coming apart. Apply a small amount of wood glue, seat the panel firmly, and hold it in place with painter's tape until the glue sets fully at least 30 minutes for most craft glues.
The winding key is stiff before I've wound it much. Stiffness at full tension is normal and expected that's the spring resistance. Stiffness with no tension yet usually means the movement isn't seated correctly and something is pressing against the winding mechanism.
One panel doesn't align with its neighbors. Check whether the panel is facing the correct direction, many laser-cut panels are not symmetrical and can be seated mirror-image of their intended orientation. If direction is correct, check whether a prior joint is only partially inserted, which can cascade into misalignment of subsequent panels.
Why Making Things Matters
We live in an era of extraordinary convenience. Almost anything can be delivered to your door in a day, assembled in minutes, and replaced without hesitation when it breaks. That convenience is genuinely wonderful. But it comes with a subtle cost that most people sense without quite articulating: the things in our lives feel less meaningful when we have no relationship to how they came to exist.
Making something changes that equation. When you build a music box from raw panels and a mechanical movement, you understand every part of it. You know how the mechanism works because you put it together. You know which joint gave you trouble and which panel you're proudest of. That knowledge doesn't just sit in your head, it sits in the object itself, and every time you wind it and listen, you're listening to something you made.
In a world of disposable objects, a handmade music box is genuinely rare: durable, personal, and made with care. It belongs in your home the same way a piece of furniture someone built for you, or a painting made specifically for you, belongs there.
That's ultimately what the best DIY kits offer. Not just a project an object worth keeping.
Ready to Start Building?
Whether this is your first mechanical kit or your latest in a long line of maker projects, there's a build waiting that's exactly right for where you are. Start with something that matches your current skill level, follow the process with patience, and let the finished piece earn its place on your shelf.
Explore the full collection at DIYative and find the build that feels right for you.