Something has shifted in the way people think about their free time. After years of frictionless digital entertainment, a growing number of adults, teens, and hobbyists are actively seeking experiences that push back a little. Things that require patience. Things that produce something real at the end. Things that make you put your phone down not because you've been told to, but because your hands are genuinely busy and your mind is genuinely engaged.
The irony is that the desire to make things has always been there. It doesn't go away just because screens are more convenient. If anything, it intensifies. There's a particular kind of restlessness that comes from spending too much time consuming and not enough time creating, and most people recognise it even if they can't always name it. The itch to build something, to solve something physical with your hands, to end an afternoon with an object that didn't exist when you started, is one of the most human impulses there is.
3D wooden puzzles and mechanical model kits have emerged as one of the most satisfying answers to that impulse. They sit at a compelling intersection: they're puzzles, so they challenge your spatial reasoning and problem-solving instincts. They're models, so they produce a finished object with genuine visual presence. And the best ones are mechanical, so the finished object actually does something, moves, plays music, rolls, operates, in a way that makes the build feel like genuine small-scale engineering rather than just assembly.
The category spans a remarkable range: vintage vehicles with working details, grand prix racing cars with precision-fit mechanical components, musical automata with hand-cranked movements. The builds vary in complexity from accessible first-timers to demanding multi-session projects for experienced hobbyist makers. What they share is a quality of engagement that's almost impossible to replicate through any other kind of hobby activity.
This guide is for anyone who's curious about 3D wooden puzzles but hasn't known where to start, for anyone who's started one and wants to get better results, and for anyone searching for a craft hobby that genuinely rewards the time and attention you put into it. By the end, you'll understand exactly what these builds involve, how to choose the right kit, how to approach the assembly process with confidence, and how to get a result you'll want to display for years.
What Are 3D Wooden Puzzles and Mechanical Model Kits?
A 3D wooden puzzle is a buildable model kit constructed from laser-cut wooden sheets. Rather than a flat jigsaw that assembles into a two-dimensional picture, a 3D wooden puzzle assembles into a fully three-dimensional object: a vehicle, an architectural structure, a mechanical device, an animal, a piece of functional machinery. The pieces are precision-cut to interlock without requiring specialist tools, and the assembly process is itself the puzzle, demanding spatial reasoning, sequential thinking, and careful hands.
The "mechanical model kit" end of this category takes the concept further. Mechanical 3D wooden puzzles include working moving parts: gears that turn, wheels that roll, cams that drive motion, springs that store and release energy, musical movements that play melodies when a handle is cranked. These kits are not just three-dimensional puzzles; they're functional machines, built to precise tolerances and designed to operate repeatedly after assembly.
The material itself matters. Laser-cut wood has a warmth, texture, and tactile quality that plastic cannot match. The natural grain of the wood is visible in the finished model. The weight is real. The surface invites touch. There's a craftsmanship quality to a well-built wooden model that elevates it above toy-level novelty into something closer to a precision object or a piece of kinetic art.
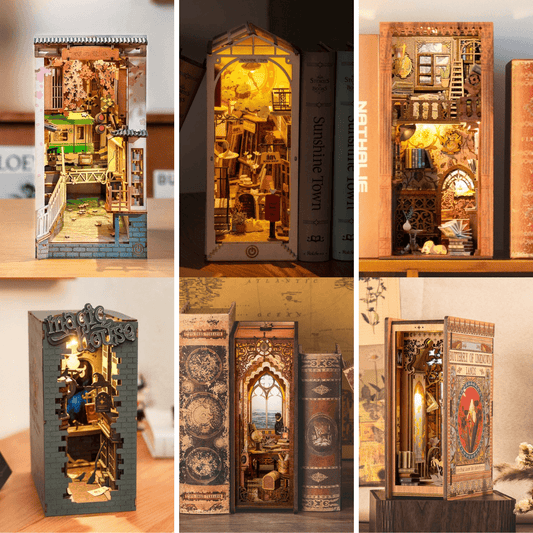
The range of themes and formats across this category is genuinely broad. Vehicle models range from vintage classics to racing cars to steam-era transport. Architectural and decorative builds include clocks, music boxes, and mechanical automata. Functional builds include working marble runs, moving puzzles, and mechanical toys. This breadth means that 3D wooden puzzles are not a single hobby but a family of related ones, connected by the building process and the quality of the raw material.
What distinguishes quality kits from inferior ones is the precision of the laser cutting, the intelligence of the assembly design, and the quality of the instructions. A well-designed kit fits together with satisfying precision, builds in a logical sequence that rewards careful assembly, and produces a finished object that accurately represents the design intention. A poorly designed kit fights you at every step and produces a result that looks nothing like the photograph.
Why This Hobby Has Found Such a Devoted Following
The timing of the resurgence in hands-on making hobbies is not accidental. As digital life has expanded to fill more and more of both working and leisure time, the appetite for physical, tangible, real-world creative engagement has grown proportionally. People are not turning to 3D wooden puzzles because they're tired of technology in the abstract. They're turning to them because they're tired of the specific quality of engagement that screens provide, and they're hungry for something different.
That something different has a specific character. It's tactile: you're handling real objects, feeling the grain of the wood, the snap of a component finding its seat, the weight of a finished model in your hands. It's spatial: you're reasoning in three dimensions, mentally rotating components, visualising how flat pieces will become three-dimensional structures. It's sequential: each step depends on the last, so the process has a satisfying logic that unfolds over time. And it's conclusive: there is a finished object at the end, and that object is yours, made by your hands, in ways that are visible in every joint and surface.
The cognitive benefits are well-established. Hands-on mechanical building develops spatial reasoning, fine motor precision, sequential problem-solving, and patience with complexity. These are not trivial skills. They're the same skills that underpin engineering, design, architecture, and surgery, and they respond to practice in ways that passive activities simply don't.
The mindfulness dimension is equally real. A 3D wooden puzzle demands full attention. You cannot be half-present during a complex assembly sequence. The build pulls you in and holds you there, creating the quality of absorbed, undistracted focus that psychologists associate with flow states and that most people find genuinely restorative. Many builders report that their build sessions are the most relaxed and present they feel all week.
For families and shared households, the building process creates a particular kind of collaborative experience. Working together on a mechanical puzzle, one person holding components while another tests the fit, both studying the instructions and debating the sequence, produces a quality of interaction that's different from watching something together or playing a game. It's more creative, more problem-focused, and often more memorable.
The finished object matters too. A 3D wooden model on a shelf is not a purchased ornament. It's evidence of a process: the hours of careful assembly, the problems solved, the mechanisms understood. Every time you look at it, you're seeing your own work. That's a particular kind of satisfaction that doesn't diminish over time.
The Different Types of 3D Wooden Puzzle: What to Know Before You Choose
The category of 3D wooden puzzle kits is broad enough to warrant some orientation before you make your first choice. Understanding the main types helps you identify which kind of build is right for your skills, interests, and available time.
Static Assembly Models are 3D wooden puzzles that build into a detailed, display-worthy model without moving parts. These typically include architectural subjects, decorative objects, and simpler vehicle designs. They're generally the most approachable entry point for first-time builders: the assembly logic is straightforward, the component count is manageable, and the result is a clean, attractive display piece. They're an excellent way to develop the foundational habits (dry-fitting, precise gluing, following sequences) that make more complex builds more successful.
Mechanical Vehicle Models are 3D wooden puzzles that build into vehicle models with working mechanical details: wheels that turn, steering mechanisms that operate, suspension elements that function. These kits require greater precision during assembly, since mechanical tolerances are tighter than purely aesthetic ones. The payoff is a finished model that operates rather than just sits, which adds enormously to both the build satisfaction and the long-term display appeal.
Mechanical Automata and Music Boxes are 3D wooden puzzle kits that incorporate hand-cranked or spring-driven mechanisms producing motion and sometimes sound. These are among the most complex and rewarding builds in the category, combining precision joinery with working gear trains and musical or animated mechanisms. They're particularly satisfying for builders with an interest in mechanical engineering or clockwork.
Functional Mechanical Builds include marble runs, mechanical puzzles, and working toys, where the finished object is designed to be used repeatedly rather than primarily displayed. These builds have the additional satisfaction of producing something that operates as a machine: marble runs that guide marbles through mechanism sequences, mechanical toys that move in response to user input.
How to Choose the Right Kit for Your Skill Level and Interests
The right kit is the one that matches your experience level and genuinely excites your interest. Getting both of these right makes the difference between a build that's deeply satisfying and one that's frustrating.
Assess your experience honestly. If you've never built a 3D wooden puzzle before, start with a kit that has a relatively modest component count, a clear linear assembly sequence, and no moving parts. Save the mechanical builds for after you've developed your foundational habits. If you've completed a few simpler builds and are comfortable with the basic process, a mechanical vehicle or music box kit is a natural next step. If you're an experienced model builder or have a background in mechanical assembly, the most complex multi-mechanism kits will offer the challenge level you're looking for.
Choose a theme that genuinely interests you. This sounds obvious but matters more than most people expect. A build that excites your curiosity produces a better result than one you're indifferent to. If you're passionate about automotive design, a vehicle kit will keep you engaged through the more demanding assembly phases. If you're drawn to mechanical music and clockwork, a musical automata kit will be far more rewarding than an equivalent-complexity architectural model.
Consider the build time realistically. Simpler kits typically take three to six hours for a focused builder. Complex mechanical kits can run ten to twenty hours and strongly benefit from multi-session building. Be honest about whether you'll commit to a longer build before you start one.
Read the instructions before purchasing if possible. Many kit retailers include instruction previews or sample pages. The quality and clarity of instructions is a significant factor in build experience, and it varies considerably between manufacturers.
Step-by-Step: How to Build a 3D Wooden Puzzle the Right Way
Step 1: Prepare Your Workspace, Tools, and Mindset
Before any component leaves its sheet, set up a workspace that's genuinely suited to the build. You need a clean, flat surface with enough area to lay out all component sheets and keep organised groups of pieces separate. Good lighting is essential: 3D wooden puzzle components are often small and subtly different from one another, and working in inadequate light leads to misidentified pieces and orientation errors that are costly to unpick.
Gather your basic tools before you start: wood glue (PVA works well), a fine applicator for precise gluing (a toothpick or small brush), fine-grit sandpaper for any edge finishing, small tweezers for fine components, and small clamps or binder clips for maintaining pressure on joints while glue cures.
Your mindset is also a tool. The builders who get the best results from 3D wooden puzzles are the ones who approach the process without rushing. This is not a race. The quality of each step determines the quality of everything that follows. Build in the expectation of patience and the willingness to redo a step if it doesn't look right, and your final result will be dramatically better.
Step 2: Pop, Sort, and Inventory Your Components
Pop all components carefully from their sheets, using a gentle rocking motion rather than forcing them free. On some sheets, especially with very fine connecting tabs, excessive force can split a component at a critical point. Work methodically across each sheet, keeping components from each sheet together in a group.
Once all components are free, lay them out and compare against the parts list in your instruction booklet. This inventory step is the single most underrated practice in kit building. Discovering a missing or damaged component before you've started assembly allows you to address it simply. Discovering it mid-build, when you've already committed several glued joints to a sequence that requires that component, is a much more stressful experience.
As you sort, pay close attention to components that appear similar but are dimensionally distinct. Many 3D wooden puzzle kits include pieces that look nearly identical but differ in small ways that are critical to correct assembly. Mark or separate these carefully so you're not hunting for the right one under time pressure later.
Step 3: Study the Instructions and Dry-Fit Before You Glue
Read the full instruction booklet from beginning to end before assembly begins. Not to memorise it, but to understand the shape of the build: the major phases, the sequence logic, the mechanisms that require special attention, and the points where the instructions are most demanding. Builders who take this step make significantly fewer mistakes.
For every major assembly phase, dry-fit components before applying any adhesive. Dry-fitting means pressing pieces together without glue to verify correct orientation, correct fit, and correct sequence. It's the most effective way to catch errors before they become permanent. On your first build especially, dry-fitting every significant joint before gluing is worth the time it adds. You will catch mistakes you would otherwise have glued into place.
This practice is particularly important for mechanical builds, where components must not only look correct but must also allow other parts to move freely. A glued joint that's one degree off alignment in a static model is an aesthetic issue. In a mechanical model, it's a functional failure.
Step 4: Build in Phases, Gluing and Curing Progressively
Don't attempt to assemble the entire model in one continuous session. Work through the build in phases, allowing glue to cure adequately between them. Most wood glues reach working strength within 20 to 30 minutes, but full cure takes longer. Structural joints that are stressed before full cure produce weak points that can cause the model to shift or fail later.
Apply glue sparingly and precisely. Excess glue is the most common cosmetic mistake in wooden model building: it squeezes out from joints, stains visible surfaces, and creates a finish that can't be fully recovered. A thin, even coat on mating surfaces is sufficient for a strong joint. Use binder clips or clothes pegs to maintain pressure while curing.
As you complete each phase, step back and assess the result before moving on. Check that joints are true, that the structure sits flat, and that any moving parts operate freely. Catching and correcting issues at the phase level is straightforward. Catching them after several subsequent phases have been built on top is not.
Step 5: Assemble Mechanisms with Extra Care and Patience
If your kit includes mechanical elements, whether gears, cams, springs, musical movements, or rolling mechanisms, give these components significantly more attention than the structural elements. Mechanical tolerances are tighter than aesthetic ones, and the correct operation of the finished model depends entirely on getting them right.
For mechanical vehicle models, this means ensuring that wheel assemblies rotate freely, that axles are correctly seated, and that any steering or suspension mechanisms have the correct range of motion. The Vintage Retro Car 3D Wooden Puzzle is a beautiful example of a kit where the vehicle's classic proportions and detailed mechanical elements reward exactly this kind of careful, phase-by-phase assembly. Every panel and rolling component benefits from the dry-fit-first approach, and the finished model has the kind of display presence that makes it a natural centrepiece on a desk or shelf. The Grand Prix Car Scale Model 3D Wooden Puzzle brings a different energy entirely: the precision and drama of motorsport translated into a scale wooden model, with mechanical details that demand careful assembly but produce a result that's genuinely striking. Racing car proportions are unforgiving of misalignment, and the sequential build-and-test approach pays dividends here.
For musical mechanical builds, this phase involves the most delicate work in the entire project. The Stagecoach Mechanical Music Box 3D Wooden Puzzle combines the visual drama of a stage-era horse-drawn coach with a working mechanical music box movement, and the assembly of the musical mechanism requires the patience and precision of watchmaking in miniature. The result, a fully functional musical automata housed in a beautifully detailed stagecoach model, is one of the most rewarding finished objects in the category. Take your time with the movement assembly, test it at every stage, and the payoff is exceptional.
Step 6: Finishing, Testing, and Final Touches
With the model fully assembled, carry out a thorough final inspection before declaring the build complete. For static models, check every visible joint for excess glue, misalignment, or gaps. A very fine sandpaper can address minor surface issues. A thin coat of clear matte wax, buffed into the wood surfaces, adds protection and a professional sheen.
For mechanical models, test every moving element through its full range of motion. Wheels should roll freely and evenly. Musical movements should play cleanly and at correct tempo. Any geared mechanisms should operate without binding or skipping. Minor adjustments at this stage, usually achievable by very lightly sanding a binding surface or repositioning a slightly misaligned component before its glue fully cures, can make the difference between a model that works and a model that works beautifully.
Clean any remaining glue residue from visible surfaces using a slightly damp cloth before it fully hardens. Step back, look at the complete model, and take a moment to appreciate what you've built. That's your finished 3D wooden puzzle, and every detail of it is the result of your own careful work.
Tools, Materials, and Tips for a Better Build
Beyond the kit itself, a small set of additional supplies makes a real difference to both the build process and the finished result. PVA wood glue applied with a toothpick gives precise, clean joints without the squeeze-out that plagues less careful application. Fine-grit sandpaper (220 grit or finer) addresses any tight-fitting components and smooths rough edges. Small craft tweezers are essential for placing fine components in confined spaces. A magnifying glass or clip-on optivisor helps enormously with the smallest mechanism components.
Good lighting is non-negotiable. A daylight-spectrum lamp positioned above your workspace illuminates fine detail and makes subtle component differences visible in ways that standard room lighting simply doesn't.
The single most valuable habit is patience with the dry-fit-and-check cycle. Builders who rush past this step spend more total time on the build because they encounter avoidable problems mid-assembly. Builders who embrace it move through the build with confidence and produce cleaner results.
For multi-session builds, store partially completed work somewhere dust-free and flat. Partially assembled wooden models are vulnerable to warping if stored on uneven surfaces, and a warped base structure will compromise every subsequent phase built on top of it.
Displaying and Caring for Your Finished Model
A well-built 3D wooden model is a display object of genuine quality. The natural wood tones, the visible craftsmanship of the joints, and the mechanical complexity of moving parts make these models compelling to look at in ways that mass-produced decorative objects rarely are.
Position your finished model where its details are visible and where it can be handled and operated if it has moving parts. Eye level or slightly below works best for most designs, where the three-dimensional depth of the construction is most apparent. Keep models out of direct sunlight, which fades wood tones and can dry out joints over time, and away from significant humidity, which can cause wooden components to swell and warp.
For mechanical models, regular operation is good for the mechanisms. Moving parts that are left static for extended periods can stiffen at pivot points. Running the mechanism periodically keeps joints free and gives you the opportunity to notice any changes in operation before minor issues develop into significant ones.
If you're displaying the model in a location where it might collect dust, a very soft brush works well for cleaning fine wooden surfaces without scratching. Avoid water and liquid cleaners on natural wood surfaces.
Frequently Asked Questions
Do I need any prior building or craft experience to attempt a 3D wooden puzzle kit?
No prior experience is necessary for entry-level kits. The components are laser-cut to fit precisely, and quality instruction booklets guide you through the assembly sequence step by step. What you need is patience, a clean workspace, and the willingness to follow the instructions carefully rather than improvising. First-time builders who take the dry-fit-first approach consistently produce better results than those who rush ahead.
How long does a typical 3D wooden puzzle build take?
Build time depends heavily on kit complexity. Simpler static models typically take three to six hours for a focused builder. Mechanical vehicle models run six to twelve hours. Complex multi-mechanism builds like musical automata can take fifteen to twenty hours and strongly benefit from spreading the build across multiple sessions. Multi-session building also tends to produce better results, as it allows glue to cure fully between phases.
Are 3D wooden puzzles genuinely suitable for adults, or are they aimed at younger builders?
The full range of 3D wooden puzzle kits spans a wide ability and interest spectrum. Entry-level kits are accessible to younger builders and beginners of any age. Intermediate and advanced kits, particularly mechanical models with working gear trains, musical movements, or complex vehicle mechanisms, are specifically designed for adult builders and offer a genuine engineering challenge. Many hobbyists with backgrounds in model-making, woodworking, or mechanical engineering find these builds among the most satisfying in their hobby repertoire.
What should I do if a component breaks or doesn't fit correctly?
If a component breaks during removal from the sheet, wood glue applied carefully can usually effect a clean repair before the component is installed. If a component doesn't fit correctly during dry-fitting, check the orientation first: incorrectly oriented components are the most common cause of apparent fit issues. If the fit issue persists after reorientation, very light sanding of the mating surfaces can improve tolerance. Most quality kit manufacturers also have replacement part processes for genuinely defective components.
Can a 3D wooden puzzle be given as a gift without the recipient having any building experience?
Absolutely. 3D wooden puzzle kits are one of the most successful gift formats for creatively curious people of any age. The key is matching the kit's complexity to the recipient's interest level and patience. For someone without prior building experience, an entry-level to intermediate kit is the right choice. For an experienced hobbyist or someone with a background in model-making or mechanical building, a more complex kit will be more rewarding.
Is it possible to paint or finish a 3D wooden puzzle differently from the natural wood finish?
Yes, and many builders do. Acrylic paints work well on laser-cut wood surfaces, and the natural grain of the wood shows through washes and light coats in ways that can produce beautiful effects. For vehicle models, painting in accurate period colours adds authenticity. For architectural and decorative builds, stains and washes can create an aged or weathered appearance. Apply any paint or stain before final assembly where possible: it's significantly easier to finish flat components than assembled corners and recessed surfaces.
Final Thoughts: Why It's Worth Starting Today
The experience of building a 3D wooden puzzle from a box of flat laser-cut sheets into a working, detailed, display-worthy model is one that's genuinely difficult to replicate through any other hobby activity. It engages your spatial reasoning, your patience, your mechanical intuition, and your hands, all at once, in a way that leaves you with something real at the end. Not a high score. Not a completed level. A physical object, made by you, that will sit on your shelf and be pointed out to every new visitor for years.
The range of builds available today means there's a genuinely right entry point for everyone: an approachable first build for someone who's never tried anything like it, a mechanical challenge for an experienced hobbyist looking for something new, a shared project for two people who want something more creative than an evening on the sofa. The hardest part is simply starting.
So clear a workspace, find a kit whose subject genuinely excites you, and give yourself the gift of a few hours of complete, absorbed, satisfying attention. You'll end the session with something to show for it. Something you built. And that, increasingly, is a rare and valuable thing.