At some point, most of us hit a wall with screens. Not just the fatigue of too many hours staring at one, but a deeper kind of dissatisfaction: the sense that everything we're doing is frictionless, disposable, and leaving no trace. You close the laptop and there's nothing to show for the last two hours. You put down your phone and the time has simply vanished. It's a feeling that's hard to articulate but easy to recognise, and it's become one of the defining frustrations of modern life.
What a lot of people find themselves reaching for, often without quite knowing why, is something physical. Something that pushes back. Something that requires you to think in three dimensions, to solve small problems with your hands, to feel the satisfying click of a piece finding its place. The desire to build things is not a nostalgic quirk or a niche hobbyist trait. It's fundamental. And when you find the right project to channel it into, the effect on your mood, your focus, and your sense of creative satisfaction can be remarkable.
3D wooden marble run puzzles have quietly become one of the most compelling answers to exactly this need. They combine the spatial challenge of a puzzle with the mechanical satisfaction of engineering, producing a finished object that actually does something: it sends a marble on a precisely engineered journey through a series of tracks, gates, ramps, and mechanisms, all built by your own hands. The result is something between a puzzle, a toy, a kinetic sculpture, and a feat of small-scale engineering. It's absorbing to build and genuinely delightful to watch in motion.
The appeal spans a much wider range of people than you might expect. Yes, younger builders love marble runs. But so do adults who enjoy mechanical puzzles. So do teenagers who want something more satisfying than gaming for an afternoon. So do families looking for a shared project. So do hobbyists with backgrounds in woodworking, model-making, or engineering who want a compact, refined challenge. The best 3D wooden marble run kits are designed with all of these people in mind.
This guide covers everything: what 3D wooden marble run puzzles actually are, why they've earned such a devoted following, how to choose the right one for your skill level, how to approach the build process for the best results, and what to do once the thing is built and working. By the end, you'll have everything you need to start your first build with confidence.
What Is a 3D Wooden Marble Run Puzzle?
A 3D wooden marble run puzzle is a buildable mechanical structure, typically constructed from laser-cut wooden components, that guides one or more marbles through a series of tracks, channels, ramps, gates, and mechanisms using gravity and occasionally simple stored energy. Unlike flat jigsaw puzzles or basic wooden construction kits, a marble run puzzle operates in three dimensions and produces a finished object that actually functions as a machine.
The "puzzle" element refers to the assembly process itself. Components must be correctly identified, oriented, and joined in a specific sequence for the structure to hold together and for the marble's path to work correctly. This is not passive construction. It requires spatial reasoning, attention to sequence, and a degree of mechanical intuition that makes the process genuinely engaging for adult builders and older teens.
The "3D wooden" element distinguishes these kits from plastic marble run sets (which are typically modular and clip-together) and from flat wooden puzzles. The use of laser-cut wood gives these kits a material quality and visual warmth that plastic simply cannot match. The finished structures have the presence of real objects: weighted, textured, precise, and satisfying to handle.
What marble run puzzles produce at the end of the build process is also worth dwelling on. This isn't a flat picture or a static display piece. It's a kinetic object. You place a marble at the top and watch it travel through every element you've assembled: the gates you fitted, the ramps you aligned, the mechanisms you seated correctly. The marble's journey is a demonstration that the build worked, that every decision you made during assembly was correct. That's a particularly satisfying kind of feedback.
Modern marble run puzzle kits range considerably in complexity, from relatively approachable builds suitable for motivated first-timers to elaborate multi-mechanism structures that will challenge experienced puzzle builders and hobbyist engineers. Understanding where a given kit sits on this spectrum, and where you sit on the experience spectrum, is the key to choosing a build that's satisfying rather than frustrating.
Why Marble Run Puzzles Matter More Than You Think
The renaissance of hands-on, analogue making hobbies over the past decade is not a coincidence. It's a response. As our working and leisure lives have migrated almost entirely onto screens, the appetite for tactile, physical, real-world engagement has grown rather than diminished. Making things with your hands addresses something that no amount of digital stimulation quite reaches.
The cognitive benefits of this kind of making are well-documented. Spatial reasoning, the ability to mentally rotate, navigate, and manipulate three-dimensional objects, is one of the most broadly useful cognitive skills a person can develop. It underpins engineering, architecture, surgery, design, and a dozen other disciplines. And unlike many cognitive skills, it responds strongly to practice. Assembling a 3D wooden puzzle builds spatial reasoning in a direct, transferable way.
The focus benefits are equally real. A marble run build demands a particular quality of attention: sustained, precise, and problem-oriented. You cannot assemble a multi-mechanism marble run structure while half-watching something else. The build pulls you in fully. Many builders describe the experience in terms that closely resemble mindfulness practice: a disappearance of background anxiety, a narrowing of attention to the immediate task, a quality of presence that's hard to find in ordinary life.
For younger builders, the developmental benefits are significant. Marble runs teach cause and effect in a vivid, immediate way: every assembly decision has a visible consequence. They build patience and persistence. They make failure instructive rather than discouraging, because a marble that doesn't run correctly tells you exactly where to look for the problem. These are skills that transfer far beyond the craft table.
For adults, the appeal is different but equally strong. There's a particular kind of satisfaction in building something complex that works. Not building it digitally, not assembling flat-pack furniture following someone else's clear-cut steps, but constructing a genuine mechanical system from components and then watching it function correctly. It feels like competence. It feels like intelligence, applied. And increasingly, people are recognising that this feeling is worth seeking out deliberately.
The Mechanics Behind the Magic: How Marble Runs Work
Understanding the mechanics of a marble run deepens both the building experience and the appreciation of the finished object. At their core, marble runs are gravity-powered transport systems: they use the constant, reliable force of gravity to move a marble from a higher point to a lower one along a controlled path.
The path itself is the engineering challenge. A straight, uninterrupted slope would move a marble from top to bottom almost instantly. The goal of a marble run design is to extend and complicate that journey: to slow the marble, redirect it, store its energy briefly, release it, redirect it again. The mechanisms that accomplish this are the puzzle within the puzzle.
Common mechanisms in quality 3D wooden marble run kits include spiral tracks (which slow the marble's descent by converting vertical drop into a longer horizontal path), trapdoors and gates (which hold the marble briefly before releasing it), switching mechanisms (which direct the marble to different paths on successive runs), pendulum elements (which the marble's weight activates), and elevator or lift mechanisms (which return the marble to a higher point in powered versions). Each of these mechanisms requires precise assembly to function correctly, which is why the build sequence matters so much.
The wood material plays a role in the mechanics as well as the aesthetics. Laser-cut wooden tracks have a specific surface friction that affects marble speed. Too smooth, and the marble runs out of control. Too rough, and it stalls. Quality kit designs account for this, specifying track widths and gradients that work correctly with the natural properties of the wood. This is part of what distinguishes a well-designed kit from a poorly-engineered one.
When all the mechanisms are correctly assembled and correctly sequenced, the result is something that feels almost alive: a marble that dips, pauses, redirects, accelerates, slows, and arrives at the bottom having taken a journey you designed and built. It's a deeply satisfying demonstration of engineering logic made physical.
Choosing the Right Marble Run Kit for Your Skill Level
Choosing well at the start makes a significant difference to the quality of the experience. Here are the key factors to weigh:
Complexity and Component Count
More complex kits have more components, more mechanisms, and tighter assembly tolerances. For a first-time builder, starting with a kit that has a clear, linear assembly sequence and a relatively modest component count is advisable. As your spatial reasoning and assembly experience develop, you'll be ready for kits that introduce multiple interlocking mechanisms and more demanding precision requirements.
Mechanism Variety
Consider what kinds of mechanical elements interest you most. Trapdoor mechanisms, swinging or pendulum elements, spiral tracks, and fortress-style multi-level structures all offer different building experiences and different visual effects in the finished piece. Some builders are drawn to the puzzle logic of switching mechanisms; others prefer the visual drama of multi-level spiral descents.
Build Time
Be honest with yourself about how much time you want to commit to a single session versus spreading the build across multiple sittings. More complex kits reward multi-session building, as it allows you to verify each section's functionality before proceeding. Simpler kits can be satisfying to complete in a single afternoon.
Display and Space
Consider where the finished structure will live. Some marble run designs are primarily vertical and have a relatively small footprint; others spread horizontally and require more shelf or table space. The visual character of the finished piece, whether it reads as a compact mechanical curiosity or a dramatic architectural construction, also varies considerably between kits.
Step-by-Step: How to Build a 3D Wooden Marble Run
Step 1: Unbox, Inventory, and Read Before You Build
The first and most important step happens before any assembly begins. Lay out all the components from your kit on a clean, flat surface and systematically compare them against the parts list in your instruction booklet. This inventory step is non-negotiable: discovering a missing or damaged component mid-build is far more disruptive than identifying it at the start.
Once you've verified your components, read the full instruction booklet from beginning to end before touching a single piece. Not to memorise it, but to understand the shape of the build: what comes first, what the major phases are, which mechanisms are most demanding, and where the potential sticking points lie. Builders who take this step make significantly fewer mistakes and produce significantly better results.
Set up your workspace with good lighting, enough clear surface area to lay out components by category, and any supplementary tools you'll need (typically a small amount of wood glue, fine-grit sandpaper for any pieces that need slight adjustment, and tweezers for small components).
Step 2: Identify and Organise Your Components by Phase
Most quality 3D wooden marble run instruction booklets organise the build into phases or sections. Before assembly begins, group your components by phase. This reduces the cognitive load during assembly: rather than hunting through a pile of components for the piece you need, you can work through an organised set.
Pay particular attention to components that look similar but are subtly different in size or cut. Marble run structures often include elements that are nearly identical but dimensionally distinct, and placing the wrong one at a critical junction will cause problems several steps later. Take the time to distinguish these carefully at the outset.
This is also the moment to do any necessary component preparation. Most laser-cut wooden puzzle kits include components with slight laser-burn residue on the edges. A very light pass with fine-grit sandpaper on any friction surfaces (track edges, gate pivot points) will ensure smoother marble movement in the finished build.
Step 3: Assemble the Base and Primary Structure
For most marble run kits, the build begins with the base structure: the frame or platform that everything else mounts to. This is the most critical phase of the build, because any misalignment in the base will compound through every subsequent layer.
Dry-fit all base components before applying any adhesive. Press them together, check that joints align correctly, and verify that the structure sits flat. Only when you're confident in the dry-fit should you apply glue. Use wood glue sparingly, applied with a toothpick or fine applicator rather than directly from the bottle. Excess glue at joints is the most common cosmetic mistake in wooden puzzle builds.
Allow base joints to cure properly before building upward. Most wood glues reach working strength within 20 to 30 minutes, but allowing 45 to 60 minutes before putting stress on the joint produces a significantly stronger result. Use small clamps or binder clips to maintain pressure during curing.
Step 4: Build and Test Each Mechanism Section
This is where the real engineering satisfaction of a marble run build lies. Work through each mechanism section sequentially, building and testing each one before moving on to the next. This is the single most important piece of advice for getting a marble run to function correctly: test incrementally, not all at once.
After assembling each mechanism section, send a marble through that section alone to verify that it functions correctly. A trapdoor should release cleanly. A switch mechanism should redirect correctly. A spiral section should guide the marble smoothly without stalling. If something doesn't work at the component level, it's straightforward to identify and fix. If you wait until the entire structure is assembled to test, diagnosing which of twenty mechanisms is causing a problem is significantly harder.
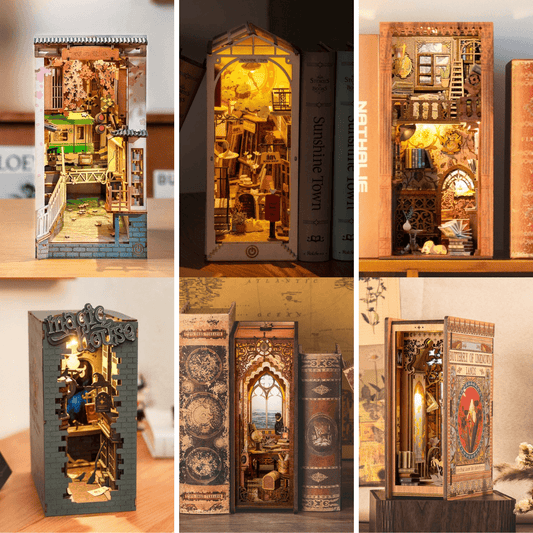
This is the phase where the design character of different kits becomes most apparent. The Marble Climber Fortress Marble Run MR-2 introduces a satisfying fortress-style multi-level structure where the marble navigates tiered platforms and descending paths, and the sequential build-and-test approach is particularly rewarding here, as each new level visibly extends the marble's journey. The Marble Explorer Swingback Wall Marble Run MR-3 introduces swingback wall mechanisms that redirect the marble in ways that are visually surprising, and testing these mechanisms individually before full assembly lets you really appreciate the engineering logic at work.
Step 5: Complete the Upper Structure and Track Connections
With the base and individual mechanism sections verified, assemble the upper structure and connect the track sections that link your mechanisms into a continuous marble path. This phase requires careful attention to track alignment: the entry and exit points of each mechanism section must align precisely with the connecting tracks for the marble to transition smoothly.
Check each track connection point by running a marble through the full connected sequence. At this stage, minor adjustments are still straightforward: a slightly misaligned track can usually be corrected by loosening the relevant joint before the glue has fully cured and repositioning. Once glue has fully set, corrections become much harder.
For kits with more elaborate mechanism arrays, such as the Marble Squad Trapdoors Marble Run MR-4 with its trapdoor system that adds timed release elements to the marble's path, this phase of connecting mechanisms into a coherent sequential system is where the full intelligence of the design becomes visible. Each mechanism you've tested individually now becomes part of a larger machine, and watching the marble navigate the complete connected path for the first time is genuinely exciting.
Step 6: Final Testing, Adjustment, and Finishing
With the structure fully assembled, run a series of complete marble tests before making any final permanent joins. Watch the marble's path carefully: note any points where it slows unexpectedly, bounces erratically, or stalls. Minor track gradient adjustments at these points (often achievable by very slightly repositioning a track section before final adhesive sets) can make the difference between a marble run that works and one that works beautifully.
Once you're satisfied with the marble's path, complete any remaining joins and allow everything to cure fully. A thin coat of clear matte wax buffed into the wooden surfaces adds both protection and a professional finish. Clean any glue residue from visible surfaces with a slightly damp cloth before it fully hardens.
Run the marble one final time. Watch it complete the full journey through every mechanism you've built. That's your finished marble run, and you made it.
Tips for Getting the Best Results From Your Build
Take your time with the inventory and reading phases. Builders who skip these steps spend more total time on the build, not less, because they encounter avoidable problems mid-assembly.
Dry-fit everything before gluing. This applies at every phase of the build, not just the base. The dry-fit is where you catch misalignments before they become permanent.
Test mechanisms individually before connecting them. This is the single most effective practice for ensuring a marble run that functions correctly on the first complete test run.
Work in good light. Many marble run components are small and subtly different from one another. Inadequate lighting leads to misidentified components and orientation errors that are frustrating to unpick later.
Don't force components that don't fit easily. Laser-cut wooden puzzle components are designed to fit with light pressure. If a component requires significant force, it's likely oriented incorrectly. Stop, check the instructions, and reorient before proceeding.
Embrace the process as much as the result. A marble run build is not primarily about the fastest route to a working machine. The build itself, the problem-solving, the incremental testing, the moment each mechanism clicks into place, is where most of the value lives.
Displaying and Using Your Finished Marble Run
A completed 3D wooden marble run is a display object as much as a functional one. The natural wood tones and the visible mechanical complexity make it genuinely attractive on a shelf, desk, or table. Most designs work best displayed at a height where the full structure is visible and where the marble's path can be followed visually from entry to exit.
The most satisfying display position is one where guests encounter it and immediately want to run the marble. Position it somewhere accessible rather than behind glass or at the back of a shelf.
Running the marble periodically is also good for the mechanism. The movement of components through their range of motion keeps joints from stiffening, and regular use gives you the opportunity to notice any changes in the marble's path before minor issues become significant ones.
For families or shared households, a marble run on a common surface invites repeated engagement. It becomes a point of interaction rather than a static display, something people return to, show visitors, and revisit casually. That ongoing engagement is one of the things that distinguishes a marble run from most other craft projects.
Frequently Asked Questions
Do I need woodworking experience or specialist tools to build a 3D wooden marble run kit?
No. Quality 3D wooden marble run kits are designed for builders without specialist skills or tools. The components are laser-cut to precise tolerances, so no cutting, drilling, or shaping is required. The tools you'll need are minimal: wood glue, tweezers for small components, and fine-grit sandpaper for any light edge finishing. The build is a puzzle-solving challenge, not a woodworking project.
How long does it take to build a 3D wooden marble run?
Build time varies considerably with kit complexity and your pace. Simpler kits can be completed in a focused afternoon of three to five hours. More complex kits with multiple mechanisms typically take six to twelve hours and are well-suited to spreading across two or three sessions. Multi-session builds often produce better results, as they allow glue to cure fully between phases.
Are 3D wooden marble run kits suitable for adults, or are they primarily for younger builders?
They're genuinely suited to a wide age range, and the more complex kits are specifically designed for adult builders. The spatial reasoning challenge, the mechanical engineering elements, and the precision required for correct assembly make these builds deeply satisfying for adults and teenagers. Many hobbyists with backgrounds in engineering, model-making, or architecture find wooden marble run kits particularly rewarding.
What happens if my marble stalls or doesn't run correctly after assembly?
A marble that stalls usually indicates a track alignment issue at a specific transition point. The best approach is systematic: run the marble to identify where it stalls, then check the track alignment and gradient at that point. Minor adjustments to track angle or position usually resolve stalling issues. This is why the incremental test-as-you-build approach is so valuable: catching these issues at the mechanism level is much easier than diagnosing them in a fully assembled structure.
Can a 3D wooden marble run kit be used as a gift for someone who doesn't have craft experience?
Absolutely, and it's one of the most successful gift formats for creatively curious people. The instructions in quality kits are designed to be accessible to first-time builders. The key is matching the kit's complexity to the recipient's patience level and interest in mechanical challenge. A first-time builder benefits from starting with a kit that's engaging but not overwhelming.
Is the finished marble run durable? Will it hold up to repeated use?
A correctly assembled wooden marble run, built with adequate glue and allowed to cure properly, is very durable. The wood construction is inherently robust, and the mechanisms are designed for repeated use. Keep the finished structure away from direct moisture and significant humidity, which can affect wooden joints and track surfaces over time. Beyond that, the structure should hold up well to regular use for years.
Final Thoughts: Why You Should Build One
There's a reason that hands-on mechanical building projects have found such a devoted following across such a wide range of people. They offer something that's genuinely hard to find elsewhere: a complete loop of challenge, engagement, problem-solving, and tangible result. You start with a box of flat wooden components and end with a working machine. That transformation, accomplished by your own reasoning and your own hands, produces a kind of satisfaction that doesn't diminish with time.
A 3D wooden marble run puzzle is one of the best versions of this experience available. The build is absorbing without being inaccessible, mechanical without requiring engineering expertise, and the finished object rewards ongoing engagement rather than sitting inertly on a shelf. Every time you place a marble at the top and watch it complete its journey, you're seeing the logic of your own assembly made visible and audible.
Whether you're looking for a project to fill a weekend with something genuinely satisfying, a shared build to do with someone else in your household, or a gift for someone who's been saying they want to make something, a marble run kit is worth your time. Find the one that excites you, clear yourself a good workspace, and start building. The marble is waiting.