If you've ever found yourself staring at a screen at the end of a long day, too tired to do anything productive but too wired to rest, you're not alone. That particular kind of exhaustion where your brain feels overstimulated and understimulated at the same time is something millions of people experience regularly. And it's part of why so many of us have started looking for something to do with our hands.
There's a growing appetite for hobbies that produce something real. Not a playlist, not a saved post, not a finished Netflix series but an actual object that sits on your desk and says, quietly, I made that. That shift in what people want from their free time isn't a trend. It's a genuine response to years of digital saturation, and it's driving a remarkable resurgence in making, building, and crafting across every age group.
The challenge is that "getting into a hobby" can feel more complicated than it should. Tools, materials, skill levels, time commitments there's a lot to consider before you even start. For many people, that friction is enough to keep them stuck scrolling instead of building. What's needed is a clear entry point: something well-designed, genuinely engaging, and achievable without a workshop full of equipment or years of experience.
DIY puzzle kits solve that problem elegantly. Whether they take the form of intricate wooden botanical builds, articulated mechanical creatures, or music boxes with working mechanisms, these kits bring together the best of puzzle-solving, model-making, and creative craft into a single, self-contained experience. No prior skills required. No separate tools to buy. Just focus, patience, and the quiet satisfaction of watching something come together in your hands.
In this guide, you'll learn exactly what makes DIY puzzle kits such a compelling hobby for beginners and experienced makers alike, why the creative and mental health benefits are very real, and how to choose, set up, and get the most out of your first or next build.
What Are DIY Puzzle Kits?
DIY puzzle kits are pre-engineered, self-contained building sets that come with everything you need to construct a detailed three-dimensional object from scratch. Most kits use laser-cut wooden components precision-cut from quality plywood or basswood that are designed to slot, click, and interlock without requiring glue, power tools, or any particular prior skill.
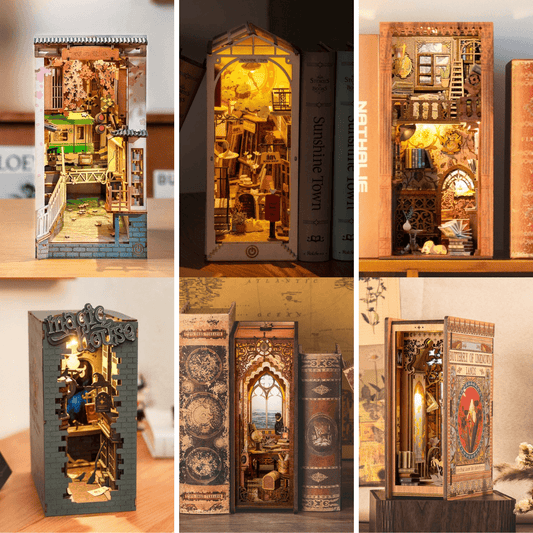
The category is broader and more diverse than most people expect. At one end of the spectrum, you have elegant botanical builds: wooden flowers, leaves, and stems that assemble into lifelike arrangements you can display at home. At the other end, you have fully mechanical models with moving gears, articulated limbs, spring-loaded mechanisms, and working music boxes. Between those two poles is an enormous range of styles, themes, and complexity levels.
What unites them is the core experience: you start with a flat sheet of pre-cut wooden pieces and, step by step, transform them into something three-dimensional, often beautiful, and sometimes kinetic. The process is methodical but never repetitive. Each stage reveals something new about the final form a wing unfolding, a gear finding its partner, a melody mechanism clicking into readiness.
Unlike many hobbies, DIY puzzle kits are genuinely accessible from day one. A beginner can sit down with a well-designed kit and produce something they're proud of in a single session. An experienced maker can choose a complex build and spend an entire weekend lost in the satisfying challenge of a multi-stage mechanical assembly. That accessibility, combined with the tangible and often beautiful results, is what has made this hobby one of the fastest-growing creative activities for adults, teens, hobbyists, and families in recent years.
Why This Hobby Matters More Than Ever
We talk a lot about the importance of creativity and mindfulness, but we spend surprisingly little time on what those things actually look like in practice for most people. Meditation apps are useful for some. Journaling works for others. But for a large portion of people, the most effective way to quiet the noise and reconnect with a sense of calm is to work with their hands on something that requires real attention.
Research consistently backs this up. Activities that combine focused manual engagement with a clear progression where you're solving small problems in sequence and seeing immediate results are particularly effective at reducing anxiety and stress. They occupy the part of the brain that tends to ruminate, without demanding the kind of effortful concentration that depletes mental energy. The result is what psychologists describe as a restorative experience: you finish feeling more settled and more yourself than when you started.
Creativity as a practice, not a talent. One of the most damaging myths about creativity is that it's something you either have or you don't. Making things with your hands dismantles that idea in the most practical way possible. Every kit you complete is evidence that you can follow a process, make decisions, solve problems, and produce something genuinely good-looking. That's creativity in its most real and accessible form, and it builds on itself over time.
The value of learning by doing. DIY puzzle kits are quietly educational in ways that don't feel like education. When you assemble a mechanical insect with articulated joints and a weighted movement mechanism, you're absorbing principles of biomechanics and structural engineering without ever opening a textbook. When you build a music box with a working comb-and-cylinder mechanism, you're learning how sound is produced mechanically. That kind of experiential knowledge sticks in a way that passive learning simply doesn't.
A genuine antidote to screen fatigue. The specific quality of screen fatigue that particular flatness and restlessness responds remarkably well to tactile engagement. Handling physical materials, feeling pieces fit together, and watching a three-dimensional object emerge from a flat sheet of wood all provide the sensory variety and genuine feedback that screens cannot replicate. Many people who take up this kind of hobby report that their relationship with screens changes too: they reach for their phone less automatically because they have something more interesting to do instead.
Meaningful connection across age groups. This is a hobby with real multigenerational range. Teens find the mechanical complexity genuinely challenging and impressive. Adults find it restorative and satisfying. Older makers appreciate the fine craftsmanship and the meditative quality of the process. Families can build together with everyone contributing meaningfully, regardless of age or skill level. That's a rare quality in any activity.
Who DIY Puzzle Kits Are Really For
The honest answer is that these kits are for almost anyone who's curious enough to start. But it's worth being specific, because the diversity of the audience is one of the things that makes this hobby so interesting.
Beginners and first-time makers will find that well-designed kits are specifically engineered to be approachable. Clear illustrated instructions, pre-cut pieces that need no additional tools, and a logical build sequence mean that the experience of your first kit should be rewarding rather than frustrating. You don't need any background in woodworking, engineering, or crafts to enjoy and complete a quality build.
Hobbyists and experienced makers will find plenty of complexity to engage with. The more advanced mechanical kits involve genuine engineering challenges gear ratios, cam mechanisms, spring tensions that reward careful attention and prior experience without being inaccessible to anyone willing to slow down and think.
Adults looking for a mindful outlet consistently report that building kits offers something that most other leisure activities don't: a sense of complete absorption that quiets the mental chatter without requiring any particular philosophy or practice. You just build, and everything else fades for a while.
Families benefit from an activity that doesn't sort participants by skill or age. A parent and teenager can tackle the same kit with genuine mutual engagement. The process is collaborative in a natural, unpressured way.
Gift buyers will find that a beautifully designed DIY kit is the kind of gift that genuinely surprises people. It offers an experience, a challenge, and a lasting result which is a combination that's genuinely hard to find in most gift categories.
Step by Step: How to Choose and Start Your First Build
Step 1: Identify What Kind of Maker Experience You Want
Before you choose a specific kit, spend a moment thinking about what you actually want from the experience. Are you looking for something calming and meditative, where the process itself is the main reward? Or are you drawn to the idea of producing a specific kind of finished object something decorative, something mechanical, something musical?
This question matters because different kit styles genuinely offer different experiences. A botanical or decorative build tends to be more contemplative and visually focused. A mechanical build is more intellectually engaging, with more problem-solving involved. A music box kit combines both the satisfaction of assembly and the reward of a working, sound-producing mechanism at the end.
Being honest with yourself about what sounds genuinely appealing (rather than what sounds most impressive) will lead you to a kit you actually enjoy, which makes all the difference between a hobby that sticks and one that ends up on a shelf unfinished.
Step 2: Choose a Complexity Level That Matches Your Experience
Resist the temptation to start with the most ambitious kit available. There's no prize for difficulty, and a kit that overwhelms you on your first attempt can put you off the hobby entirely which would be a genuine shame.
Beginner and intermediate kits are specifically designed to be rewarding without being punishing. They'll still challenge you in all the right ways and produce a finished result you're proud of. Once you've completed one build and have a feel for how these kits work how pieces are identified, how joints fit together, how to read illustrated instructions you'll be much better equipped to take on something more complex.
A good rule of thumb: if a kit's description mentions advanced mechanical systems, multiple independent moving parts, or an estimated build time of six hours or more, treat it as a project for your second or third build rather than your first.
Step 3: Set Up Your Space Before You Start
The quality of your building environment makes a bigger difference than most first-time makers expect. You want a flat, clean, well-lit surface natural daylight or a good desk lamp makes identifying small pieces much easier. A light-coloured surface is particularly helpful because the wooden components show up clearly against it.
Have a few extras on hand: a small dish or tray to hold loose pieces, a pair of tweezers for particularly fine components, and a soft cloth to protect more delicate elements of the build. Some makers like to have a notebook nearby to jot down observations or mark their place in the instructions if they need to step away.
Most importantly, set aside a realistic amount of time and protect it. The building experience is significantly better when you're not rushing or watching the clock. Even if you can only dedicate an hour, make it a genuinely uninterrupted hour.
Step 4: Read the Full Instructions Before You Start Building
This is the step most first-time builders skip, and it's the one most consistently recommended by experienced makers. Before you punch out a single piece, read through the entire instruction booklet. You don't need to memorize it you just need a mental map of where the build is going, which stages connect to which, and whether there are any steps where a component needs to be installed before something else is built on top of it.
For kits with working mechanisms, this overview step is especially valuable. Understanding the mechanical logic of the build before you start means you'll recognize what you're creating at each stage, which makes the whole process more engaging and far less likely to result in a frustrated disassembly halfway through.
This is also the step where you'll discover how much variety exists within the DIY kit category. A decorative build like the Wooden Flower Bouquet DIY 3D Puzzle comes with instructions focused on the graceful assembly of petals, stems, and leaves into a lifelike botanical arrangement a very different read from the mechanical engineering logic that guides a build like the Rhinoceros Beetle Mechanical Species DIY 3D Puzzle, which involves articulated legs, a weighted body mechanism, and a level of biomechanical detail that's genuinely impressive to page through before you even begin.
Step 5: Build in Stages and Test as You Go
Work through your build exactly as the instructions specify, one stage at a time. The sequence is not arbitrary each stage is designed to make the next one easier and more logical. Skipping ahead or improvising the order is the single most common cause of build problems, and it's almost always avoidable.
For mechanical builds, test every moving part at the end of each stage. If a gear feels stiff, if a joint doesn't rotate smoothly, or if a mechanism seems reluctant address it now, while that section is still accessible. A small correction at stage three is a five-minute fix. The same correction at stage seven, after several more components have been built on top, can be a significant frustration.
Embrace the process of testing as part of the experience rather than a distraction from it. There's something particularly satisfying about watching a mechanism function correctly as you build it it makes the final result feel genuinely earned.
For builds that include a musical mechanism, the reward of that testing process is even more immediate. A kit like the Seaside Cafe TechArt 3D DIY Music Box builds toward a fully functioning music box and hearing the melody emerge from a mechanism you've assembled yourself is one of those maker moments that's hard to describe to someone who hasn't experienced it. It's part engineering satisfaction, part genuine delight.
Step 6: Finish, Display, and Document Your Work
Once your build is complete, give it the attention it deserves. Find a display spot that does justice to the craftsmanship somewhere with good light, away from direct sunlight (which can fade and warp wood over time) and away from high humidity. A finished wooden kit is a genuinely beautiful object, and it deserves to be seen.
Take photographs at different stages of the process, not just the end. Many makers find that documenting the build adds another layer of satisfaction it creates a record of the process and makes the finished result feel even more meaningful. If you share it online, the maker community is genuinely enthusiastic and warm, and seeing other people's reactions to something you built is its own kind of reward.
And then, almost inevitably, start thinking about the next build.
How to Make the Most of the Building Experience
Don't rush. The single best piece of advice for any maker, at any level. The building experience is where most of the value lives not just the finished object. Slowing down, paying attention to each piece and each connection, and genuinely engaging with the process rather than trying to reach the end as quickly as possible transforms a good kit into a great experience.
Work in good light. It sounds mundane, but poor lighting is the cause of most identification errors with wooden components. Natural daylight is ideal. A decent desk lamp is a worthwhile investment if you plan to build regularly.
Accept imperfection in the process. First builds almost always involve a moment where something doesn't fit quite right or a step needs to be redone. This is completely normal. The laser-cut joinery in quality kits is forgiving enough to allow for disassembly and reassembly without damage in most cases. Treat corrections as part of learning rather than as failures.
Make it social when it suits you. Many makers find that building alongside a friend, partner, or family member adds a dimension to the experience that solo building doesn't provide. Talking through the instructions together, dividing stages between you, and sharing the small victories along the way creates a memory around the finished object that gives it even more meaning.
Personalize your finished build. Wooden kits respond beautifully to finishing treatments. A light coat of clear varnish or wax protects the wood and enhances the natural grain. Some makers choose to stain or paint elements of their build to create a more personalized result. This is entirely optional, but it's a lovely way to make a finished piece genuinely your own.
Tips for Displaying and Sharing Your Finished Work
A completed wooden puzzle kit is genuinely display-worthy, and how you present it matters. Here are a few principles that work well for most builds:
Avoid direct sunlight. UV light fades wood and can cause warping in fine components over time. A spot with good ambient light but no direct sun exposure is ideal.
Consider the background. Wooden models tend to stand out beautifully against neutral or dark backgrounds a light shelf with a dark wall behind it, or a dedicated display cabinet. The natural wood tones are warm and rich, and they benefit from a backdrop that lets them read clearly.
For mechanical builds with moving parts, choose a location where the movement can be demonstrated. Part of what makes these objects special is that they do something let them do it where people can see.
If you're sharing on social media, a simple, clean setup with good natural light and a minimal background will do more for the image than any filter. The craftsmanship in these kits speaks for itself when it's photographed well.
Frequently Asked Questions
Do I need any tools or prior experience to build a DIY puzzle kit? No tools and no prior experience are required for the vast majority of DIY wooden puzzle kits. The pieces are laser-cut to fit together precisely, and quality kits include everything you need for the build. If you can follow illustrated step-by-step instructions, you have all the skills required to get started. Some builders find tweezers useful for fine components, but they're not essential.
How long does a typical build take? Build time varies significantly depending on the kit's complexity. Simpler kits can be completed in one to two hours. Intermediate builds typically take four to six hours, which many people spread across multiple sessions. Advanced mechanical kits can take an entire weekend. Most product descriptions will give you a clear indication of expected build time, so it's worth checking before you buy if timing matters to you.
Are these kits suitable for teens as well as adults? Absolutely. Most DIY wooden puzzle kits are recommended for ages 14 and up, and many teens find the mechanical complexity of advanced kits genuinely engaging and impressive. The hobby is popular across a wide adult age range too the meditative quality of the building process and the craftsmanship of the finished results appeal strongly to people in their 20s, 30s, 40s, 50s, and beyond.
What happens if I make a mistake or break a piece? Most wooden puzzle kits are designed with forgiving joinery, meaning pieces can typically be disassembled and reassembled without damage if no glue has been applied. If a piece is genuinely broken, many manufacturers can supply replacements it's worth contacting the seller directly. In most cases, a careful nudge and a moment of patience resolves any fitting issue without any damage at all.
Can these kits be built in multiple sessions, or do I need to finish in one sitting? Multiple sessions work perfectly well for most builds. Simply stop at a natural break point between stages, store your partially completed build somewhere safe and flat, and pick up where you left off. Many builders actually prefer spreading a complex kit across several evenings it extends the enjoyment of the process and gives you something to look forward to.
Are DIY wooden puzzle kits a good gift? They're an excellent gift, particularly for people who enjoy making things, appreciate craftsmanship, or are looking for a screen-free creative outlet. A well-chosen kit offers both an experience and a lasting result, which is a combination that's genuinely hard to find. The key is matching the kit's theme and complexity to the recipient's interests and patience level a mechanical insect build for someone who loves nature and engineering, a music box for someone who appreciates sound and intricate detail, a floral arrangement for someone with a decorative eye.
Start Building Something You'll Be Proud Of
The most consistent thing people say after completing their first DIY wooden puzzle kit is that they wish they'd started sooner. Not because the finished object is so impressive (though it often is), but because the process itself turned out to be so much more rewarding than they expected.
Building something with your hands following a process, solving small problems, watching a three-dimensional object emerge from a flat sheet of wood offers a quality of engagement that most other leisure activities simply don't. It's absorbed, present, and productive in the best possible sense. And unlike so many things we spend our time on, it leaves you with something real.
Whether you're drawn to delicate botanical craftsmanship, articulated mechanical creatures, or music boxes with working melodies, there's a kit that's exactly right for where you are right now as a maker. The only real requirement is the willingness to start.
Explore the full range of DIY kits, mechanical models, and creative builds at DIYative and find the build that's been waiting for you.