Everything you need to know about DIY music box kits, from how they work and why they're worth building, to getting started with your first project at home.
There's a particular kind of quiet satisfaction that comes from making something that produces sound. Not a recording, not a stream, not a playlist, but an actual mechanical object that plays a melody because of the way its parts are assembled. A DIY music box is exactly that kind of thing.
For a lot of people, the idea of building their own music box sounds far more complicated than it actually is. The reality is that modern DIY music box kits are designed to be approachable, clearly structured, and genuinely enjoyable from the first piece to the last. The mechanics are fascinating, the build process is absorbing, and the finished result is the kind of object that stays on a shelf for years rather than months.
At the same time, there's a growing number of adults, teens, and hobbyists who are actively searching for creative activities that exist entirely offline. Something that doesn't involve a screen, doesn't require a subscription, and doesn't disappear when you close a tab. Hands-on building fills that gap in a way that very few other activities can, and music box kits in particular offer a unique combination of craft, engineering, and artistry that's difficult to find anywhere else.
If you've ever been drawn to the idea of building something that's both beautiful and functional, a DIY music box is one of the most rewarding entry points into hands-on making. It's patient work that rewards attention, and the finished piece is genuinely worth displaying.
In this guide, you'll learn exactly what DIY music box kits are, why they've become such a beloved hobby for makers and hobbyists worldwide, and how to approach your first build step by step with confidence.
WHAT IS A DIY MUSIC BOX KIT?
A DIY music box kit is a buildable set that allows you to assemble a fully functional music box from individual components. Unlike a pre-made music box you simply wind and listen to, a DIY kit gives you every part of the experience, from sorting and organizing the pieces to assembling the mechanical movement that generates the melody.
Most kits combine a hand-cranked or spring-wound musical movement with a decorative enclosure, scene, or structure that you build around it. The result is a finished object that is both a working instrument and a handcrafted display piece.
DIY music box kits span a wide range of styles, themes, and complexity levels. Some are designed around romantic or nostalgic scenes, miniature townscapes, natural settings, or iconic artistic references. Others focus more on the mechanical movement itself, foregrounding the gears and cylinders that create the sound. What they share is the principle that the person who builds it is the one who brings it to life.
These kits are genuinely for all skill levels. You don't need to know anything about woodworking, music theory, or mechanical engineering to build one successfully. The instructions guide you through the process, and the components are designed to fit together in ways that make sense as you go.
THE MECHANICS BEHIND THE MELODY: HOW MUSIC BOXES WORK
Understanding how a music box produces sound makes the build more interesting and the finished piece more impressive. The core mechanism is elegantly simple.
A music box works through a rotating cylinder or disc mounted with precisely placed pins. As the cylinder turns, those pins pluck the tuned metal tines of a comb, each tine producing a specific note when struck. The sequence and spacing of the pins determines the melody. The speed of rotation determines the tempo.
In a hand-cranked music box, turning the handle directly drives the cylinder. In a spring-wound music box, winding stores mechanical energy that releases gradually as the spring uncoils, keeping the cylinder turning at a consistent speed.
The comb, the cylinder, and the mechanism housing are the heart of the music box. Everything else, the decorative enclosure, the scene, the moving figures, is built around that core to create the finished piece you display and share.
When you build a DIY music box kit, you're not just assembling a decorative object. You're constructing a working mechanical instrument from scratch, and that changes how you experience both the building process and the finished result.
WHY THIS HOBBY IS WORTH YOUR TIME
Hands-on hobbies have always existed in contrast to passive entertainment, but the contrast feels sharper now than it has in a long time. Screens are everywhere, attention is fragmented, and the simple act of focusing on a single physical task for an extended period has become genuinely rare.
Building a DIY music box addresses that directly. It asks you to slow down, follow a sequence, and engage your hands and mind together. The reward for that attention is something you can hold, display, and share in a way that a finished level or a completed playlist simply can't match.
Beyond the general benefits of hands-on making, DIY music box kits offer something specific.
They combine craft and engineering in a single project. You're not just building something that looks good or something that works. You're building something that does both. The mechanical movement and the decorative structure are equally important, and assembling them together gives the whole project a depth that purely decorative crafts don't always provide.
They produce results that feel genuinely special. A finished DIY music box is the kind of object people notice. It prompts questions, it invites interaction, and it tells a story about the person who made it in a way that a purchased item never can.
They scale naturally with skill and ambition. A beginner kit introduces the core mechanics and basic construction principles. More complex kits add moving elements, intricate scenes, additional musical movements, and greater structural challenges. The hobby grows with you rather than running out of depth.
They make exceptional gifts. A music box you built by hand carries a significance that no store-bought equivalent can replicate. Many builders make their second or third kit specifically as a gift for someone else.
WHAT TO EXPECT FROM YOUR FIRST BUILD
Going into your first DIY music box build with realistic expectations makes a significant difference in how much you enjoy the process.
Expect the build to take longer than you think. A beginner kit might take three to five hours. More complex kits with detailed scenes and higher piece counts can take considerably longer, especially when spread across multiple sessions. That time isn't a cost; it's the point.
Expect some moments of confusion. Most first-time builders hit a point where the instructions show a configuration that doesn't immediately make visual sense. This is normal and almost always resolves by slowing down, looking at the components from a different angle, and re-reading the step in question.
Expect the musical movement to feel delicate. The comb and cylinder assembly at the heart of the music box are precision components. Handle them carefully, follow the instructions for seating them correctly, and avoid forcing any connections that feel resistant. Patience here pays off significantly.
Expect the finish to be satisfying in a way that's difficult to describe until you experience it. Winding the finished music box and hearing it play for the first time, knowing you assembled every piece of the mechanism that's producing that sound, is a genuinely memorable moment.
STEP-BY-STEP GUIDE TO BUILDING YOUR FIRST DIY MUSIC BOX
1) Choose a kit that matches both your skill level and your aesthetic
DIY music box kits vary in complexity, but they also vary significantly in visual style and theme. For your first build, balance both considerations. A kit that excites you visually will carry you through the parts of the build that require patience. A kit that matches your current skill level will make the process feel manageable rather than overwhelming.
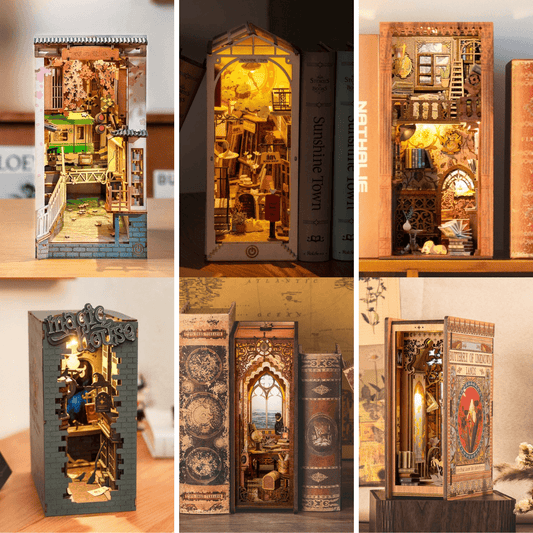
If you're drawn to atmospheric scenes with intricate detail, something like the Snow World DIY Music Box is a beautiful entry point, combining a well-structured build process with a visually striking finished piece that works equally well as a personal project or a gift.
For something with a more romantic and painterly aesthetic, the Romantic Paris DIY Music Box offers a similarly approachable build with a finished result that feels genuinely special on a shelf or desk.
2) Set up a proper workspace before you open the kit
Before anything else, prepare your environment. A clear, flat, well-lit surface with enough space to lay out your components without crowding is the single most important setup condition for a smooth build.
Small parts benefit from containment. A shallow tray, a piece of felt, or even a rimmed baking sheet prevents pieces from rolling away. Sorting components by type before you start saves meaningful time later and reduces the kind of mid-build confusion that interrupts your flow.
Keep a pair of tweezers nearby for placing small components precisely. Most kits don't require tools, but tweezers are genuinely useful when handling fine parts in tight spaces.
3) Read through the full instructions before placing a single piece
This step is easy to skip and consistently worth doing. Reading through the complete instruction set before you begin gives you a mental map of the entire build. You'll know which sections come early, how the mechanical movement gets introduced, where the decorative elements are added, and what the finished structure should look like before you're halfway through.
Think of it as a walkthrough. The actual build goes more smoothly when you already understand the sequence and can anticipate what's coming.
4) Build the mechanical movement first and test it before adding the enclosure
The heart of a music box kit is the musical movement. Most kits are designed so that you assemble the mechanical core before constructing the decorative structure around it. Follow this sequence carefully.
Once the movement is assembled, test it before proceeding. Wind or crank it gently and confirm that the melody plays cleanly. If something sounds off or the mechanism feels stiff, address it at this stage rather than after the enclosure is built around it. Accessing and adjusting the movement is significantly easier before the rest of the structure is in place.
5) Assemble the decorative structure in defined stages
Once the movement is confirmed to be working, build the surrounding structure section by section. Most kits divide naturally into a base, walls or supports, decorative elements, and a top or lid assembly. Complete one section fully before moving to the next.
At each stage, step back and compare your progress against the instruction illustrations. Catching a misaligned piece or a missed connection early is far easier than discovering it three stages later.
For builders who want to step up to a more ambitious project after completing a first kit, the Christmas Dream Gift Factory DIY Music Box represents a genuinely impressive build, combining a complex decorative scene with a rich musical movement in a kit that rewards the patience and methodical approach developed through earlier builds.
6) Finish, wind, and let it play
Once your music box is fully assembled, wind or crank it slowly for the first time and listen. The first playthrough of a music box you've built yourself is one of those moments that stays with you.
Place it somewhere visible. Wind it occasionally. Let other people hear it. A DIY music box is not a private object; it's something made to be shared, and sharing it is part of what makes the effort worthwhile.
HOW TO DISPLAY AND CARE FOR YOUR FINISHED MUSIC BOX
A completed DIY music box deserves a display spot that protects it while letting it be seen and heard. Keep it out of direct sunlight, which can affect both wooden components and delicate moving parts over time. A bookshelf, a desk corner, or a dedicated display surface all work well.
Dust the model gently with a soft brush rather than a cloth, which can catch on fine structural elements. If the kit includes a transparent enclosure panel, use a clean dry cloth to keep it clear.
Wind or crank the movement regularly rather than leaving it wound for extended periods. Keeping the mechanism moving occasionally helps maintain the condition of the spring and gears over time.
If you plan to give a finished music box as a gift, a small card describing which kit it was built from and how long it took to complete adds a personal dimension that makes the gift significantly more meaningful.
If you're ready to explore the full range of DIY music box kits available, the DIYative Music Box collection is a good place to start.