There's a particular kind of magic in a music box. The moment the cylinder turns and those tiny metal teeth begin to pluck their notes, something happens that no playlist or streaming service can replicate. It's intimate. It's physical. And when you've built the thing yourself, the sound carries an emotional weight that's genuinely hard to describe.
Most of us spend our days consuming things, scrolling through content, watching shows, listening to music someone else made on a device someone else designed. There's nothing wrong with that, but something gets lost when every creative experience is passive. The itch to make something, to hold a finished object and say "I built this," doesn't go away just because we're busy. It quietly accumulates.
DIY music box kits have emerged as one of the most satisfying responses to exactly that itch. They sit at a rare intersection: complex enough to be genuinely absorbing, approachable enough that a complete beginner can succeed, and beautiful enough that the finished piece earns a permanent place in your home. You don't need woodworking experience, specialist tools, or an engineering background. You need patience, a clear workspace, and a few hours you're willing to give fully to the process.
This guide is for anyone who's ever been curious about how music boxes work, anyone who's wanted a creative project that produces something real and lasting, and anyone looking for a hands-on experience that's genuinely different from anything else in their hobby repertoire. Whether you're building for yourself, with a family member, or putting together a gift that's as much about the making as the giving, you're in the right place.
By the end of this guide, you'll understand exactly how DIY music boxes work, what to expect from the building process, how to choose the right kit for your skill level and taste, and how to get the best possible results from your build. Let's begin.
What Is a DIY Music Box?
A music box is a mechanical instrument that produces sound by using a set of tuned metal tines, sometimes called a comb, that are plucked by pins or a rotating cylinder. The mechanism is centuries old, originating in Switzerland in the late 18th century, and it remains one of the most elegant examples of mechanical engineering ever put into everyday use. No electricity, no amplification, no software. Just precision metalwork and physics producing something achingly beautiful.
A DIY music box kit takes this mechanism and packages it into a buildable format. Rather than purchasing a finished object, you receive the components: pre-cut wooden panels, the mechanical movement (the cylinder and comb assembly), decorative elements, and hardware. Your job is to assemble these components into a working instrument.
What distinguishes quality DIY music box kits from simple toy-level crafts is the sophistication of the finished product. A well-made kit produces a music box that looks and sounds genuinely refined, with real tonal quality from the metal movement and real visual presence from the woodwork and design details. It's not a facsimile of a music box. It is one.
The themes and aesthetics available across today's kit market are remarkably broad: cityscape designs that evoke specific places, romantic and vintage-inspired scenes, seasonal and atmospheric designs, literary references. This breadth means that choosing a kit is partly a creative decision in itself. You're not just picking a difficulty level. You're picking a world.
Why Building a Music Box Matters More Than Buying One
In an age of same-day delivery and infinite digital distraction, choosing to build something slowly and carefully by hand is a quiet act of rebellion. It's also, increasingly, recognised as something genuinely good for you.
The research on hands-on creative work is consistent: making things reduces cortisol levels, improves mood, builds a sense of self-efficacy, and creates a quality of focused attention that's almost impossible to achieve through passive activities. The state that craftspeople, hobbyists, and makers describe when they're deep in a build, that absorbed, time-dissolving concentration, maps closely onto what psychologists call flow. It's the same state athletes and musicians chase, and it's available to anyone willing to sit down with a craft project and give it their full attention.
There's also something specifically powerful about building a musical instrument, even one whose core mechanism comes pre-assembled. Music is bound up with memory and emotion in ways that other sensory experiences simply aren't. A music box you've built carries a dual emotional charge: the associations of the melody itself, and the memory of the hours spent making it. Every time you wind it and listen, you're hearing both of those things at once.
For families, the shared build is its own reward. There's a particular kind of conversation that happens when people are working together on something with their hands, relaxed, focused, laughing at small mistakes, pointing out what's working. It's different from any other kind of family time. More honest, somehow. More present.
And for gift-givers, the calculus is simple: a music box you've built for someone is categorically different from a music box you've bought for them. The time is visible in the object. The care is audible in every note.
How DIY Music Box Kits Work: The Mechanics Explained
Before you build one, it helps to understand what you're building. The core of any music box is the movement: a small metal mechanism comprising a rotating cylinder (or disc) studded with precisely placed pins, and a steel comb with tines of varying lengths that produce different pitches when plucked.
When you wind the music box (turning a key or knob that tensions a mainspring), you store mechanical energy. As the spring releases, it rotates the cylinder. Each pin on the cylinder, as it passes the comb, lifts and releases a tine. The length of the tine determines the pitch; the position of the pin on the cylinder determines when that note is played. The result is a programmed sequence of pitches, a melody, encoded entirely in the physical arrangement of metal pins and tines.
The movement in a quality DIY kit is a genuine precision instrument, not a toy. It's manufactured to fine tolerances to ensure the notes ring clearly and the timing holds accurately. This is why the sound of a well-made music box has a clarity and purity that surprises people who've only ever encountered cheap novelty versions.
The wooden structure of the kit serves two purposes. Practically, it houses and protects the movement. Aesthetically, it creates the visual character of the finished piece. The box shape acts as a resonance chamber, subtly amplifying and warming the sound. The decorative elements, windows, figurines, architectural details, create the world that gives the object its personality.
Choosing the Right Kit: Style, Complexity, and Theme
The right kit depends on a few things: your experience level, your aesthetic preferences, how much time you want to invest, and whether this is a personal project or a gift.
For first-time builders, the key variable is complexity. More component-dense kits with elaborate exterior detailing require more patience and precision. A kit with cleaner lines and fewer small decorative parts is more forgiving for a beginner, allowing you to focus on getting the fundamental assembly right before worrying about fine decorative details.
Theme is partly a personal preference and partly a strategic choice. Cityscape and architectural themes tend to have strong structural logic that makes assembly more intuitive. Romantic and seasonal themes often prioritise decorative complexity and visual warmth over structural challenge.
Consider also what melody the music box plays. Quality kits are designed around specific tunes, and the melody matters enormously to how the finished object feels. A piece that carries personal meaning, a favourite song, a melody associated with a place or a person, transforms the music box from a craft object into something genuinely sentimental.
Think about display context too. Where will the finished piece live? A cityscape design reads differently on a minimalist modern shelf than it does on a cluttered, cosy bookshelf. Most music box aesthetics skew toward warmth and nostalgia, but the specific character varies considerably between kits.
Step-by-Step: How to Build Your DIY Music Box
Step 1: Prepare Your Workspace and Inventory Your Components
Before you touch any adhesive, set up a clean, well-lit workspace with enough room to lay out all your components. A self-healing mat is helpful but not essential. Good lighting matters more than most beginners expect: many of the finer components are small, and working in inadequate light leads to mistakes that better light would have prevented.
Open your kit and systematically lay out every component, comparing against the parts list in your instruction booklet. This step is non-negotiable. Discovering a missing piece mid-build is far more stressful than addressing it before you start. While you're doing this, read the instruction booklet from beginning to end. You don't need to memorise it, but understanding the full arc of the build before you begin helps you make better decisions at every stage.
Step 2: Understand the Movement Before You Enclose It
The movement, the mechanical heart of your music box, will be enclosed by the wooden structure once assembly is complete. Before that happens, take a few minutes to operate it in the open: wind it, let it play, listen to the melody. Understand how the winding mechanism works and how it connects to the movement. This isn't just satisfying (though it absolutely is). It's practical. If there's any issue with the movement, you want to identify it before it's inside a box.
Familiarise yourself with how the movement will sit in the base structure, which direction it faces, and where the winding key will exit. These details affect several subsequent assembly decisions.
Step 3: Assemble the Base Structure
The base is the foundation everything else builds on. Most kits use a tab-and-slot wooden construction that, when correctly assembled, creates a very sturdy structure without requiring complex joinery skills. Dry-fit the base panels before applying any adhesive. This is the single most important habit in kit assembly: dry-fit first, glue second.
Apply PVA glue to joints in small amounts. Excess glue is the most common beginner mistake. It squeezes out, stains the wood, and creates a finish that no amount of sanding fully rescues. Use a toothpick or pin to apply glue precisely. Hold joints for 30 to 60 seconds after pressing together, then use small binder clips or clothes pegs to maintain pressure while the glue cures. Don't rush this phase. A crooked base means everything built on top of it is crooked.
Step 4: Install the Movement
With the base structure cured and solid, install the movement according to the instructions. This step typically involves securing the movement to a base plate and ensuring the winding shaft aligns correctly with its exit point in the structure. Take your time. The movement needs to be firmly seated and correctly oriented, and it needs to be accessible for winding once the full structure is assembled.
This is also the moment to consider your approach to the winding mechanism exterior, the key or knob that the user will interact with every time they play the music box. Make sure it's positioned, exposed, and operable before you close up the structure around it.
Step 5: Build Up the Exterior and Decorative Layers
With the movement installed and the base solid, you can begin building the exterior character of the music box. This is where the kit's theme comes to life, and it's often the most enjoyable phase of the build.
Work from the inside out and from the bottom up. Attach structural exterior panels before decorative elements. Apply any painted or stained finishes to components before they're in position if possible. It's significantly easier to paint a flat panel than an assembled corner. Many builders also add subtle weathering effects at this stage, a light dry-brush of a pale tone over wood surfaces, or a thin ink wash to add depth to recessed areas.
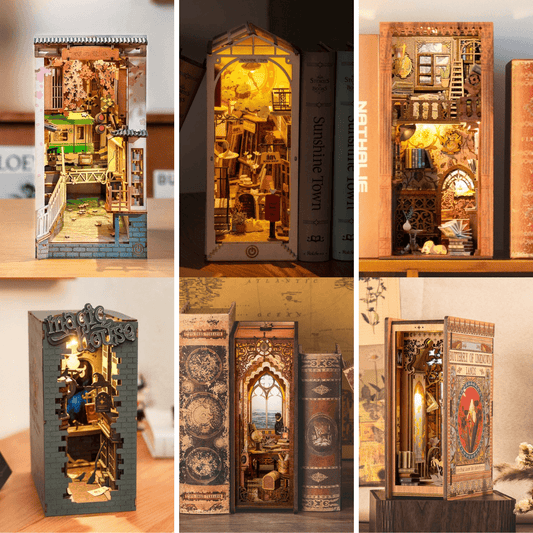
This is the phase where the personality of each kit becomes fully visible. The London City DIY Music Box takes shape here as a beautifully atmospheric urban scene, the kind of rain-slicked London street that feels both specific and timeless. The architectural details reward careful assembly and a patient hand, and the finished piece has a visual character that makes it unmistakable on any shelf. The Romantic Paris DIY Music Box unfolds differently: its aesthetic is warmer, more ornate, a love letter to the city in miniature form, with decorative elements that create genuine romantic atmosphere. For a completely different mood, the Snow World DIY Music Box builds into something quietly enchanting: a winter scene full of soft light and stillness, the kind of object that earns a permanent place on a mantlepiece and gets wound every single evening.
Step 6: Final Assembly, Testing, and Finishing
With all structural and decorative elements in place, do a final check of the complete assembly before any remaining adhesive joins are made permanent. Wind the music box and listen. The melody should be clear, even, and properly timed. If any notes sound muffled or irregular, the movement may have shifted slightly during assembly and may need repositioning before the structure is fully closed.
Once you're satisfied with the sound and the visual finish, complete any remaining joins and allow everything to cure fully. The finishing touches make an enormous difference: a small amount of beeswax or clear wax buffed into the wood surfaces adds both protection and a warm sheen. Any decorative paper elements can be sealed with a thin coat of matte medium to protect against handling.
Wind it up. Listen. You made that.
Tools and Tips for a Better Build
Beyond what the kit includes, a few additions make a real difference. Small craft tweezers are essential for placing tiny decorative components. A set of fine acrylic paints (warm browns, aged whites, and blacks) allows you to add subtle tonal variation to wood surfaces. Washi tape is useful for masking during any painting work. A magnifying glass or clip-on optivisor is optional but genuinely helpful for the finest detail work, especially in the decorative exterior layers.
The single most useful habit is patience with dry times. PVA glue feels set within minutes but isn't fully cured for much longer. Structural joints that are disturbed before full cure create weak points that compromise the whole assembly. Build in waiting time. Make tea. Look at what you've done so far. The build will be better for it.
Keep your instruction booklet visible and follow the sequence as written, especially on your first build. The order matters in ways that aren't always obvious until you've deviated from it and realised why the instruction was written that way.
Displaying, Gifting, and Caring for Your Finished Music Box
A finished music box deserves a considered place in your home. Most designs read best at or slightly below eye level when seated, where the fine details of the construction are visible and the sound projection is optimal. Keep the box away from direct sunlight, which can fade papers and warp wooden components over time, and away from humid environments, which can affect both the wood structure and the metal movement.
For gifting, consider presenting the kit rather than the finished object. The building experience is itself part of the gift. A kit given with a note that says "build this, and every time you wind it you'll remember the time you spent making it" is a different object entirely from a finished music box purchased and wrapped. Both are wonderful. The kit gives more.
The mechanism benefits from very occasional light lubrication (a tiny amount of clock oil applied to the movement's pivot points) if you notice any slowing or irregularity after extended use. Beyond that, a music box requires almost no maintenance. It's a mechanism designed to last decades, and many do.
Frequently Asked Questions
Do I need any prior craft or building experience to build a DIY music box kit?
No. Quality DIY music box kits are designed to be accessible to complete beginners. The components are pre-cut and the instructions are step-by-step. What you need is patience, a clean workspace, and the willingness to follow the instructions carefully. Most first-time builders are genuinely surprised at how manageable the process is.
How long does it take to build a DIY music box?
Most builds take between three and eight hours depending on the complexity of the kit and your pace. Many builders spread the build across two or three sessions, which actually produces better results as it allows glue to cure properly between stages. There's no prize for speed, and rushing is the most common cause of mistakes.
Is building a DIY music box a good activity for families or couples?
Absolutely. The build is well-suited to two people working together, with enough distinct tasks at each stage to keep both people engaged. It's a particularly good activity for adults with teenagers, for couples looking for a shared project, or for any two people who want something genuinely engaging to do together. The focused, collaborative nature of the build tends to produce good conversation.
What melody does the music box play? Can I choose?
Each kit is designed around a specific melody, encoded in the movement's cylinder. The melody is a core part of the kit's identity and aesthetic. Check the product description before purchasing to confirm which tune is included. Some ranges offer multiple melody options within the same design.
Can the finished music box be used as a gift even if the recipient didn't build it?
Of course. A finished DIY music box that someone has built is a deeply personal and beautiful gift. The fact that it was handmade is visible in the object and adds enormously to its sentimental value. Many people build music box kits specifically as gifts, putting in the hours so that the recipient receives something that carries genuine care and craft.
How do I care for the finished music box and keep the mechanism working well?
Keep it out of direct sunlight and away from significant humidity. Wind it gently, not forcing the mechanism past its natural resistance. If you notice any slowing or uneven timing after extended use, a tiny drop of clock oil on the movement's pivot points will usually resolve it. Beyond that, the mechanism is robust and requires very little ongoing care.
Final Thoughts: Why You Should Build One
There are hundreds of hobbies and craft projects competing for your time, and most of them are perfectly good. But the DIY music box occupies a category of its own. It produces a finished object with genuine aesthetic and emotional power. It engages your hands, your attention, and your patience in ways that feel restorative rather than draining. And it gives you something, at the end of those hours, that no amount of scrolling or streaming can produce: a small mechanical marvel that plays a melody because you put it together, piece by piece, exactly right.
The first time you wind a music box you've built and hear the melody play clearly, something shifts. It's a small shift, but it's real. You made something that works. Something that makes music. Something that might outlast you by decades and play for people you haven't met yet.
That's worth a weekend afternoon. That's worth the patience and the small frustrations and the wait while the glue cures. Browse the kits, find the one that speaks to you, and start building.