The Tiny World That's Taking Over Bookshelves Everywhere
Imagine sliding a book aside on your shelf to reveal, not empty wall, but a glowing lantern-lit library stretching deep into the darkness, complete with miniature staircases, dusty tomes, and the faint suggestion of worlds beyond. That's the magic of a DIY book nook, and it's one of the most rewarding craft projects you can build this year.
Book nooks have quietly become one of the most talked-about maker projects across every corner of the internet. They appeal to readers, builders, designers, and daydreamers alike. And unlike many hobby projects that require years of skill to pull off, a well-designed book nook kit makes the experience accessible to absolute beginners, while still giving experienced makers something genuinely satisfying to sink their hands into.
Whether you're a first-time crafter, a seasoned hobbyist looking for something new, a parent wanting a creative family project, or a gift-buyer searching for something truly memorable, this guide is for you. We'll walk through everything: what book nooks are, why they're so compelling, how to choose the right kit, what skills you'll build along the way, and how to get the best possible results.
Let's build something magical.
What Exactly Is a DIY Book Nook?
A book nook (sometimes called a bookshelf insert or book tunnel) is a miniature diorama designed to fit between books on a standard shelf. From the outside, it looks like a slice of another world peering through the gap in your collection: a hidden alley, a cozy library, an enchanted forest, a tavern, a theatre. The visual illusion is startlingly effective. The combination of forced perspective, layered depth, and warm LED lighting tricks the eye into seeing depth that isn't quite there.
Most book nooks are constructed from a combination of laser-cut wood panels, miniature furniture and props, textured papers, paint, and LED light strips or fairy lights. The result is a self-contained scene that sits on your shelf like a living illustration.
DIY book nook kits take this a step further: they come with pre-cut components and everything you need, or nearly everything, so that the building process itself becomes part of the experience. You're not just displaying a finished object. You're crafting it.
Who Are Book Nooks For?
Book nooks are for adults who want a meditative, skill-building hobby that produces a beautiful finished object. They're for teens and young adults who enjoy model-building, gaming miniatures, or detailed crafting. They're for families who want a shared weekend project that everyone can contribute to. They're for book lovers who want their shelves to feel as alive as the worlds inside their books. And they're for gift-buyers who want to give something genuinely original and experiential.
The kits we'll be discussing throughout this guide are designed with all of these people in mind. They're rich enough to challenge and reward adult builders, while remaining approachable enough for enthusiastic beginners.
Why Build a Book Nook? The Case for Making Something by Hand
We live in an era of instant gratification: streaming, delivery, digital everything. And yet, there's a quiet counter-movement growing. More and more people are actively seeking out slow, tactile, hands-on creative experiences. They want to make things. And not just any things, but things that last, that have meaning, that carry the memory of the hours spent building them.
Book nooks sit at a particularly sweet spot in this movement.
The Process Is as Good as the Result
Cutting, fitting, painting, gluing, wiring. The assembly of a book nook unfolds across hours or even days. Each step reveals something new. There's a moment, usually somewhere in the middle of construction, when the piece suddenly starts to look like what it's supposed to be, and that moment is genuinely thrilling.
Unlike puzzles or paint-by-numbers, a book nook gives you a permanent, displayable result. You're not just passing time; you're making something that will live on your shelf for years.
It Develops Real Skills
Book nook building touches on a surprisingly wide range of skills: spatial reasoning and three-dimensional thinking, fine motor control and precision, color theory and painting technique, basic electronics (LED wiring), and an eye for scale and composition. Many builders report that their nook projects have sparked deeper interests in woodworking, model-making, interior design, and miniature art.
It's a Genuinely Meditative Experience
There's something about the small-scale, focused nature of book nook assembly that invites a particular quality of attention, the kind that's hard to find in everyday life. You can't scroll your phone while fitting a tiny bookshelf into a 3cm space. You have to be present. Many makers describe their building sessions as deeply relaxing, almost meditative.
The End Result Is Extraordinary
A finished book nook on a shelf is a showstopper. Guests notice it immediately. Friends want to know where you got it. The answer, "I made it," carries a particular kind of quiet pride that's hard to replicate any other way.
Choosing the Right DIY Book Nook Kit: What to Look For
Not all book nook kits are created equal. Here are the key factors to consider:
Component Quality and Precision: The best kits use laser-cut wood panels with tight tolerances, meaning the pieces fit together cleanly without requiring excessive sanding or improvisation.
Completeness of Inclusions: A good kit should include structural components, decorative elements, and lighting hardware. Check whether the kit includes LED lights, which make an enormous difference to the finished effect.
Design Complexity and Theme: Consider your experience level and what theme resonates with you. Literary and library-themed nooks tend to be perennially popular.
Instruction Quality: Clear, well-illustrated instructions can make the difference between a satisfying build and a frustrating one.
Scale and Dimensions: Make sure the kit fits your shelf. Most standard book nooks are designed for shelves with at least 20 to 25cm of vertical clearance and 8 to 12cm of depth.
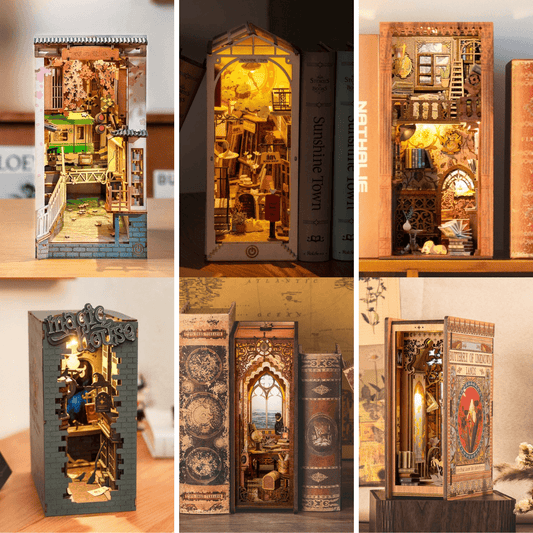
Three Book Nook Kits Worth Building
For the Literary Soul: Library of Wisdom DIY Book Nook
If you love books, deeply and devotedly, this kit is going to speak directly to you. It creates a towering, atmospheric miniature library: the kind of place that exists in the imagination of every serious reader. Think spiral staircases, shelf upon shelf of tiny volumes, warm amber light filtering down from above.
What makes this kit particularly special is the layered depth effect. As you look into the nook, your eye travels through multiple visual planes, each adding to the sense of a space that extends far beyond its physical dimensions. The assembly process is satisfying and methodical, making it a great first nook for a motivated beginner or a deeply rewarding build for an experienced maker.
For the Theatre Fan and History Lover: Shakespeare Bookstore DIY Book Nook Kit
This kit brings Elizabethan character and charm to your shelf in the form of a meticulously detailed vintage bookshop. This isn't just a library, it's a specific place, full of atmosphere and story: creaking floorboards, stacked antique volumes, the kind of shop where you could spend an afternoon and lose track of time entirely.
This kit rewards careful, patient assembly. It's an especially good choice for builders who enjoy painting and surface finishing, as the textural elements of this design are particularly satisfying to work through. Whether you're a literature teacher, a theatre lover, a history buff, or simply someone who appreciates beautifully crafted objects, this nook has a story to tell.
For the Ambitious Builder: Vintage Internal Library DIY Book Nook Kit
If you're ready to take things up a level, this kit is a masterclass in miniature design. It recreates the interior of a grand vintage library with extraordinary detail: arched ceilings, sweeping staircases, atmospheric lighting, and the overwhelming sense of accumulated knowledge that only truly great libraries possess.
The build is more involved than a beginner kit, but the payoff is proportionally spectacular. This is a project for someone who wants to commit, to put real hours into something and end up with an heirloom-quality piece that will be a fixture on their shelf for decades.
Tools and Supplies: What You'll Need Beyond the Kit
Most quality kits include the core components, but a few basic supplies will make your build smoother. You'll want PVA glue as your primary structural adhesive, quick-setting super glue for small precise joins, and double-sided tape for paper and fabric elements. For painting, grab a small set of acrylic paints (dark browns, aged whites, warm yellows, and blacks), fine detail brushes in sizes 0, 1, and 2, and matte varnish for a professional finish. Essential tools include small craft tweezers, a self-healing cutting mat, a craft knife with fresh blades, and good lighting. A magnifying glass or optivisor is optional but highly recommended for very fine detail work.
Step-by-Step: How to Approach Your First Book Nook Build
Step 1: Unbox and Inventory. Before you glue a single thing, lay out all your components and compare them against the parts list. Also take a few minutes to study the instruction booklet end-to-end.
Step 2: Dry-Fit Before You Glue. For any major structural assembly, put components together without adhesive first to check that everything aligns correctly.
Step 3: Paint Before Assembly Where Possible. It's much easier to paint components before they're assembled than to try to work paint into tight corners afterward. Interior back walls, floor panels, and ceiling panels should all be painted at the component stage.
Step 4: Work from the Inside Out. Place your background elements first before layering forward. This is what creates the depth illusion that makes book nooks so visually compelling.
Step 5: Install Lighting Early. Plan your lighting layout early and route your wires before assembling the enclosing panels. Many builders add more LED strips than the kit specifies, a small extra investment that pays off dramatically.
Step 6: Add Weathering and Finishing Touches Last. Dry-brushing, ink washes, subtle distressing, these finishing techniques are what elevate a clean nook into something that looks genuinely aged and inhabited. Apply lightly and build up gradually.
Common Mistakes and How to Avoid Them
Using Too Much Glue. Excess glue squeezes out from joints and creates a finish that looks amateur regardless of how carefully everything else is done. Use small amounts, applied precisely.
Rushing the Dry Time. PVA glue requires patience. Significant structural joints can take 30 to 60 minutes to fully set. Trying to continue assembly before glue has cured properly leads to misalignment and weak joints.
Skipping the Inventory Step. Nothing derails a build session like discovering a missing part mid-assembly.
Ignoring the Instructions on First Read. Instructions for detailed kits are written in a specific order for a reason. On your first build especially, follow the sequence as given.
Over-Painting. Less is more with weathering effects. Build up in thin layers, stepping back to assess after each application.
The Community Side of Book Nook Building
Across Reddit, Instagram, YouTube, and dedicated crafting forums, there are thousands of makers sharing their builds, asking for advice, and helping beginners troubleshoot problems. Diving into these communities is one of the best things a new builder can do, both for practical tips and for inspiration. Seeing what other makers have done with their nooks opens up creative possibilities you might not have imagined on your own.
Many makers also progress from kits to designing their own nooks from scratch, using the skills learned from kit builds as a foundation for fully original creations.
Book Nooks as Gifts: Why They Work
A book nook kit is one of the most successful gift formats for creatively-minded people. It's genuinely experiential: the hours spent building are themselves part of the gift. The finished piece is deeply personal, because the builder makes choices at every step. It occupies a gift category that's surprisingly rare: genuinely original. And it has lasting presence. A book nook on a shelf is noticed, pointed out to every new visitor, a fixture rather than a forgotten item.
For book lovers, history enthusiasts, creative types, and adults who've expressed interest in making things but don't know where to start, a beautifully designed kit is a gift that genuinely delivers.
Displaying Your Finished Book Nook
The visual effect depends on books being pressed against it on both sides. Position the nook at roughly eye level when seated. The LED lights are far more dramatic in a dimly lit room, so consider ambient lighting during evenings. Colour-coordinate the books immediately adjacent to the nook if you can. And if you want to photograph it, shoot at twilight or in low ambient light for best results.
Where to Go After Your First Build
One book nook tends to lead to another. Move up to more complex kits, begin customising with your own added details, or eventually design a nook entirely from scratch. The skills also transfer naturally to miniature roomboxes, model railway scenic construction, terrain building for tabletop wargames, and architectural model making.
Start Small, Build Something You'll Keep Forever
There's something quietly countercultural about sitting down to build a miniature world by hand, to spend hours on something small, detailed, patient, and beautiful. It doesn't matter whether this is your first craft project or your fiftieth. What matters is the act of making, the hours of focused attention, the satisfaction of each completed step, and the quiet pride of putting something you've built on a shelf where people will notice it.
Start with a kit that excites you. Give yourself the time to do it right. And when it's done and the lights are on and someone walks past and stops and says "wait, what is that?" you'll understand exactly why this hobby has the kind of hold it does.
Now go make something extraordinary.